

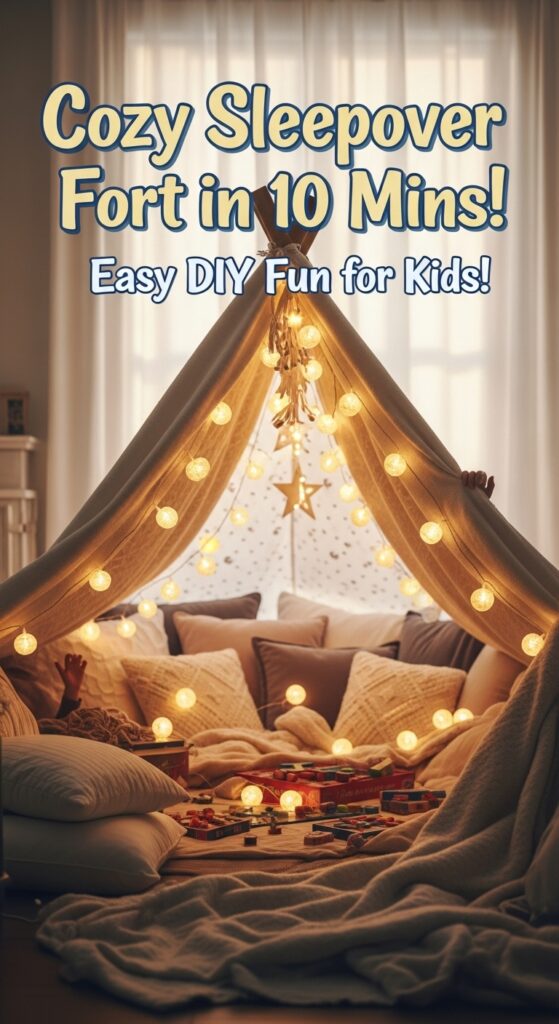
Let’s Build Something Epic (Without the Engineering Degree)
Remember that feeling when you were a kid and someone suggested building a fort? That instant surge of excitement? Well, guess what—you’re never too old for that magic. I’ve built more blanket forts than I care to admit (both as a kid and, okay fine, last weekend), and I’m here to tell you that creating the ultimate sleepover fort takes about 10 minutes if you know what you’re doing.
No complicated blueprints. No engineering background required. Just pure, cozy vibes and maybe some snacks within arm’s reach. 🙂
What You Actually Need (Skip the Fancy Stuff)
Let’s talk gear. I’ve seen people overthink this to death, buying specialty fort-building kits and whatnot. Here’s what actually works:
The Essentials
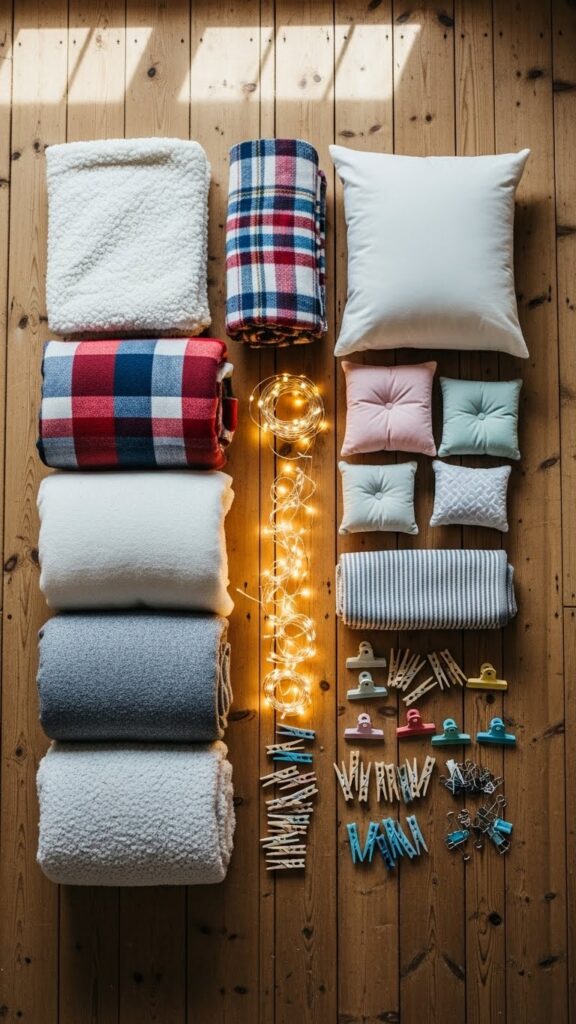
- 3-4 large blankets (sheets work too, but blankets have more drama)
- Every pillow you own (seriously, raid the entire house)
- Clips or clothespins (binder clips are your secret weapon, FYI)
- Chairs, couches, or bed frames (your structural anchors)
- Fairy lights or flashlights (because ambiance matters)
- Optional: Command hooks (for the overachievers among us)
The beauty here? You probably have 90% of this stuff already lying around. I learned the hard way that you don’t need to spend money to create something magical. My first “fancy” attempt involved buying expensive tent clips. Total waste. Regular binder clips from your desk drawer work just as well.
Your Ultimate Fort-Building Shopping List
Okay, so maybe you’re starting from scratch or want to upgrade your fort game. Here’s exactly what to grab on your next shopping trip, broken down by priority.
Must-Have Items (Don’t Skip These)
Structure & Support:
- 3-4 throw blankets (60″ x 80″ minimum) – $15-25 each
- 1 large fleece blanket for the roof (90″ x 90″ is perfect) – $20-35
- 24-pack of large binder clips (2-inch size) – $8-12
- 1 box of heavy-duty clothespins (50-pack) – $6-10
- Command hooks variety pack (holds up to 3 lbs) – $12-18
Comfort Essentials:
- 6-8 standard pillows (mix firm and soft) – $10-20 each
- 2-3 decorative throw pillows – $15-30 each
- 1 faux fur throw blanket for luxury vibes – $25-40
Lighting:
- 2 strings of warm white fairy lights (16-33 feet each) – $12-20 per string
- Battery-operated LED candles (6-pack) – $15-25
- Extra batteries (AA or AAA depending on your lights) – $10-15
Estimated Total for Must-Haves: $250-400
Yeah, I know that sounds like a lot. But remember—you’re building something you’ll use repeatedly. Plus, these aren’t fort-specific items. You’re literally just buying cozy home stuff that happens to make amazing forts.
Nice-to-Have Upgrades
Enhanced Comfort:
- Memory foam floor cushions (2-4 pieces) – $20-35 each
- Chunky knit throw blanket for aesthetic points – $30-50
- Fuzzy body pillow for ultimate lounging – $25-40
- Soft area rug or foam mat for floor padding – $30-60
Atmosphere Boosters:
- Sheer curtain panels for dreamy walls – $12-20 per panel
- Small clip-on reading lights – $10-15 each
- Battery-operated string lights in fun shapes – $15-25
- Essential oil diffuser with calming scents – $20-35
Entertainment & Snacks:
- Lap desk or breakfast tray for stable surfaces – $20-35
- Storage baskets for organizing supplies – $15-25 each
- Insulated tumbler with lid (no spills!) – $15-30
- Bluetooth speaker for music – $25-50
Estimated Total for Upgrades: $200-400
Budget-Friendly Alternatives (Because We’re Not All Made of Money)
Look, I get it. Not everyone wants to drop $400 on fort supplies. Here’s how to do this on the cheap:
The Bare Minimum List:
- 2-3 blankets from home (free!)
- All your existing pillows (free!)
- Paper clips or hair clips for hanging ($3-5)
- Use existing furniture for structure (free!)
- Phone flashlight wrapped in white paper for lighting (free!)
- Snacks from your pantry (free!)
Thrift Store Goldmine:
- Blankets and sheets – $3-8 each
- Throw pillows – $2-5 each
- String lights (check carefully for working bulbs) – $5-10
- Curtains for walls – $4-8 per panel
Dollar Store Wins:
- LED tea lights – $1-3 per pack
- Plastic clips and clothespins – $1-2
- Small battery-operated lights – $3-5
- Storage containers – $1-3 each
Estimated Budget Build: $30-75
Honestly? Some of my best forts were built with 100% materials I already owned. Don’t let the fancy shopping list intimidate you.
Where to Actually Shop
For Quality Basics:
- Target (their Threshold line has amazing throw blankets)
- IKEA (unbeatable prices on basics)
- HomeGoods/TJ Maxx (treasure hunt for deals)
- Walmart (budget-friendly everything)
For Aesthetic Upgrades:
- Amazon (convenience king, plus reviews help)
- Urban Outfitters (pricey but those chunky knits though)
- World Market (unique textures and patterns)
- Anthropologie (if you’re feeling fancy)
For Lighting:
- Amazon (huge selection of fairy lights)
- Hardware stores (Command hooks and clips)
- Craft stores like Michaels (seasonal light sales)
- Five Below (seriously underrated for LED options)
My Personal Shopping Strategy
Here’s what I actually do: I buy one or two nice pieces per month instead of everything at once. This month, maybe a really nice chunky blanket. Next month, upgrade my fairy lights. It’s way easier on the wallet and you end up with better quality stuff.
Also? Wait for sales. Black Friday, post-holiday clearance, back-to-school season—all prime times to stock up on blankets and pillows. I once scored six throw blankets for $8 each during a January clearance. Best fort investment ever.
Storage Solutions (So You Can Build Again)
Once you’ve invested in supplies, keep them together:
- Large storage bins with lids – $15-25
- Vacuum storage bags for blankets – $10-20 per pack
- Over-door organizer for clips and lights – $10-20
- Under-bed storage containers – $20-35
Having everything in one place means your easy setup stays easy. No hunting through closets for that one perfect blanket.
The Speed Setup Method (Yes, Really 10 Minutes)
Step 1: Pick Your Kingdom
Choose your location wisely. I always go for between two beds, a couch and a chair, or a bed and a wall. Why? You need sturdy anchor points that won’t collapse when someone inevitably leans against your masterpiece.
Corner spaces work brilliantly because you’re already working with two walls. Less structural drama, more time for the fun stuff. Trust me on this—I once tried building a fort in the middle of a room using only chairs. It lasted exactly 12 minutes before catastrophic collapse.
Step 2: Create Your Roof
This is where the magic happens. Take your largest blanket and drape it over your anchor points. Use those binder clips or clothespins to secure the edges to furniture. Pull it taut—you want that satisfying canopy effect, not a saggy mess that’ll drop on your head mid-movie.
Pro tip? Layer two blankets if you want that extra cozy canopy feeling. The double layer blocks out more light and creates better insulation. Plus, it just looks cooler, IMO.
Step 3: Build Your Walls
Grab your remaining blankets and start creating walls. You don’t need to close everything off—leave an entrance, obviously (unless you enjoy being trapped). I usually drape one blanket along each side, securing them with clips to your main roof structure.
Want to get fancy? Use different colored or textured blankets for a layered look. My personal favorite combo is a chunky knit blanket on top with lighter, flowy curtains for the walls. Creates this whole bohemian vibe that’s absolutely perfect for sleepover inspo.
Section Image Prompt: Interior view of completed fort showing layered blankets creating walls, string lights hanging from ceiling, scattered pillows on floor
Pillow Fort Ideas That Actually Work

Let’s talk pillows. This is where most people just toss them randomly and hope for the best. But there’s an art to pillow placement, friends.
The Foundation Layer
Line the entire floor with your flattest pillows or cushions. This creates your base—the foundation of comfort. I learned this after one too many sleepovers where my hip bones got intimately acquainted with hardwood floors. Not fun. :/
The Wall Reinforcements
Stack firmer pillows along your blanket walls. This serves two purposes: it keeps your walls from collapsing inward, and it creates perfect backrests for lounging. You’re essentially building a cozy nest where you can sit comfortably for hours.
The Luxury Layer
Now throw all your fluffy, decorative pillows on top. These are your comfort pillows—the ones you’ll actually use for sleeping or cuddling during movie marathons. Mix sizes and textures. Velvet with faux fur? Chef’s kiss.
Lighting: From Basic to “Wow, You Did That?”
Here’s where you transform from “cute fort” to “this is actually magical” territory. Lighting makes or breaks the vibe.
Fairy Light Magic
String lights are non-negotiable in my book. Drape them along your roof’s interior, weaving them through your blanket layers. The soft glow creates this magical space that regular overhead lights just can’t match.
I prefer warm white lights over multicolored—they’re cozier and less “birthday party,” more “enchanted hideaway.” But hey, you do you.
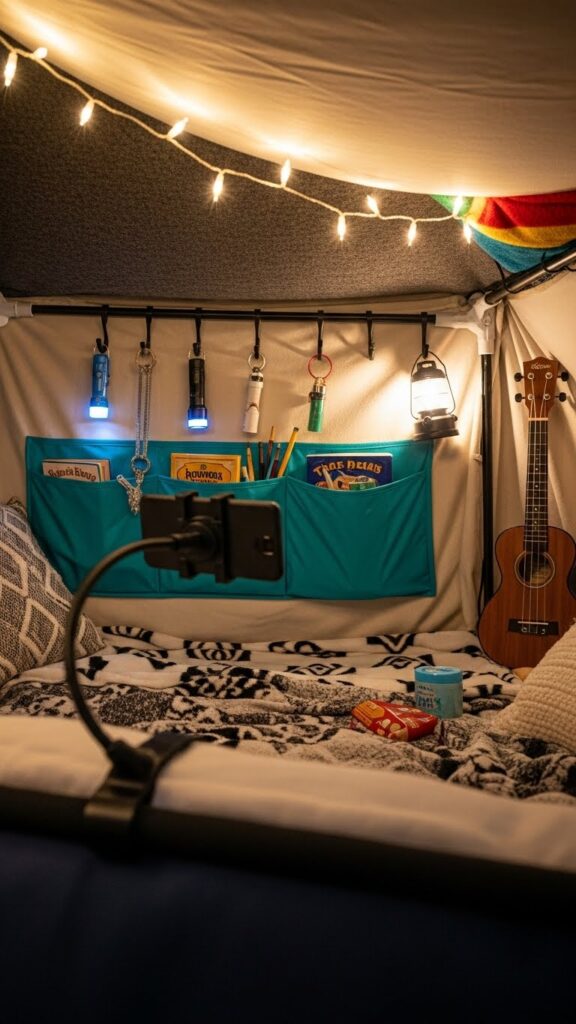
Alternative Light Sources
- LED candles (because real candles + blankets = terrible idea)
- Small reading lamps clipped to your structure
- Phone flashlights wrapped in tissue paper for diffused light
- Glow sticks if you’re feeling nostalgic
Layer your lighting sources. One central fairy light strand plus a few scattered LED candles creates depth and warmth. It’s the difference between “I can see” and “I never want to leave this fort.”
The Cozy Factor: Beyond Just Blankets
You’ve got structure and lighting. Now let’s talk about the details that make your fort genuinely cozy.
Texture Is Everything
Mix your blanket materials. Combine:
- Chunky knits for visual interest
- Fleece for warmth
- Smooth cotton for breathability
- Faux fur for pure luxury
This blanket fort tutorial isn’t complete without mentioning temperature control. Seriously. Too many blankets and you’ll roast. Too few and you’ll freeze. Start with your base structure, then add throw blankets inside that people can use or toss aside as needed.
The Snack Station
Set up a designated snack corner. Use a flat pillow or small tray to create a stable surface. Stock it with easy-to-eat snacks that won’t make a mess—think wrapped candies, chips in bowls, and drinks with secure lids.
I once made the mistake of bringing soup into a fort. Once. Learn from my failures.
Entertainment Central
Prop a tablet or laptop against your pillow wall for movies. Bring books, cards, or whatever you’re into. The key is having everything within reach so you don’t have to constantly crawl in and out of your cozy creation.
Advanced Tips for Fort Perfection
Want to level up? Here’s what separates the amateurs from the fort-building legends.
The Command Hook Game Changer
Stick Command hooks on your walls before draping blankets. This gives you perfect anchor points that won’t damage paint. You can pull your blanket roof much tighter, creating that professional canopy look.
Just remember—they need 30 minutes to set before bearing weight. Plan accordingly.
Ventilation Matters
Ever been in a fort that got stuffy after 20 minutes? Yeah, not fun. Leave strategic gaps in your walls for airflow. You can cover them with lighter, breathable fabrics if you want the enclosed feeling without the suffocation.
The Quick-Collapse Feature
This sounds counterintuitive, but hear me out. Use clips instead of knots. When it’s time to dismantle (the sad part), you can take everything down in literally 60 seconds. Your future self will thank you when you’re tired and just want to crash in an actual bed.
Troubleshooting Common Fort Fails
Let’s address the disasters we’ve all experienced.
The Saggy Roof Syndrome
Your roof keeps drooping? You need more tension and better anchor points. Pull your blankets tighter and use heavier clips. If you’re using lightweight sheets, switch to blankets—they have more structure.
The Collapse Mid-Movie
This usually happens because your anchor points weren’t stable enough. Chairs need to be weighted down (stack books on them). If using bed frames, tuck your blanket edges under the mattress for serious holding power.
The Dark Cave Effect
Too many layers blocking all light? Swap one of your roof blankets for a lighter sheet. You want cozy dim lighting, not pitch-black isolation chamber vibes.
Making It Instagram-Worthy (Because Why Not?)

If you’re going to put in the effort, you might as well capture it for posterity. Here’s how to make your fort photo-ready:
- Coordinate your colors: Pick a palette of 2-3 complementary colors for your blankets and pillows
- Style your entrance: Drape it artfully, maybe tie it back with a ribbon
- Add greenery: A small potted plant near the entrance adds life
- Perfect the lighting: Take photos during golden hour with your fairy lights on
The key to good sleepover inspo content? Make it look cozy but lived-in, not sterile. Toss a few books casually, leave a mug visible, show that someone actually wants to hang out in there.
Quick Variations for Different Spaces
The Dorm Room Special
Limited space? Go vertical. Create a canopy over your bed using Command hooks on the ceiling (check your dorm rules first). Drape sheer curtains or light blankets from a central point for that dreamy, enclosed feeling.
The Living Room Takeover
Use your couch as the back wall and extend outward with chairs. This gives you maximum floor space for multiple people. Perfect for actual sleepovers where you need room for sleeping bags.
The Bedroom Corner Nook
Transform an unused corner into a permanent cozy reading spot. Use wall-mounted curtain rods to create a semi-permanent structure you can open and close. This is my personal favorite for an easy setup that stays ready to use.
The Final Touch: Making It Memorable
Here’s what I’ve learned from building countless forts: the structure matters, but the memories happen because of what you do inside it.
Stock it with whatever makes you happy. Bring your favorite playlist. Invite your best friend. Make it a phone-free zone where you actually talk and laugh.

The best fort I ever built wasn’t the most structurally sound or aesthetically perfect. It was the one where my best friend and I stayed up until 3 AM talking about everything and nothing, surrounded by blankets that kept trying to fall on our heads.
Wrapping This Up (Pun Intended)
You now have everything you need to create a cozy, magical fort in about 10 minutes. Will your first attempt be perfect? Probably not. Will it still be awesome? Absolutely.
The secret sauce isn’t in having the perfect materials or following instructions exactly—it’s in committing to the bit and creating a space that feels like yours. So grab those blankets, clip them up, and build something cozy.
And hey, if anyone gives you grief about being “too old” for blanket forts, invite them to try it. I guarantee they’ll end up staying in there longer than they’d ever admit. 😉
Now go forth and build. Your cozy kingdom awaits.