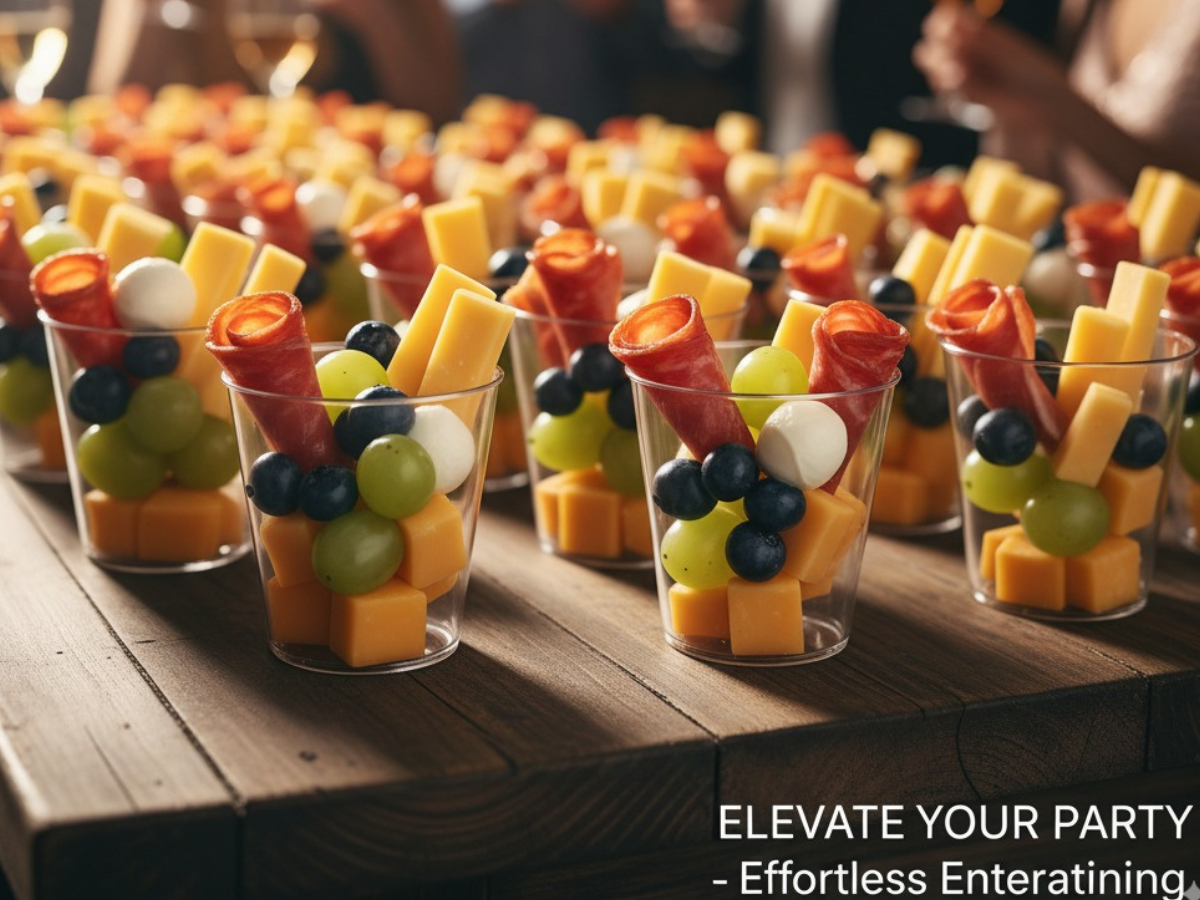
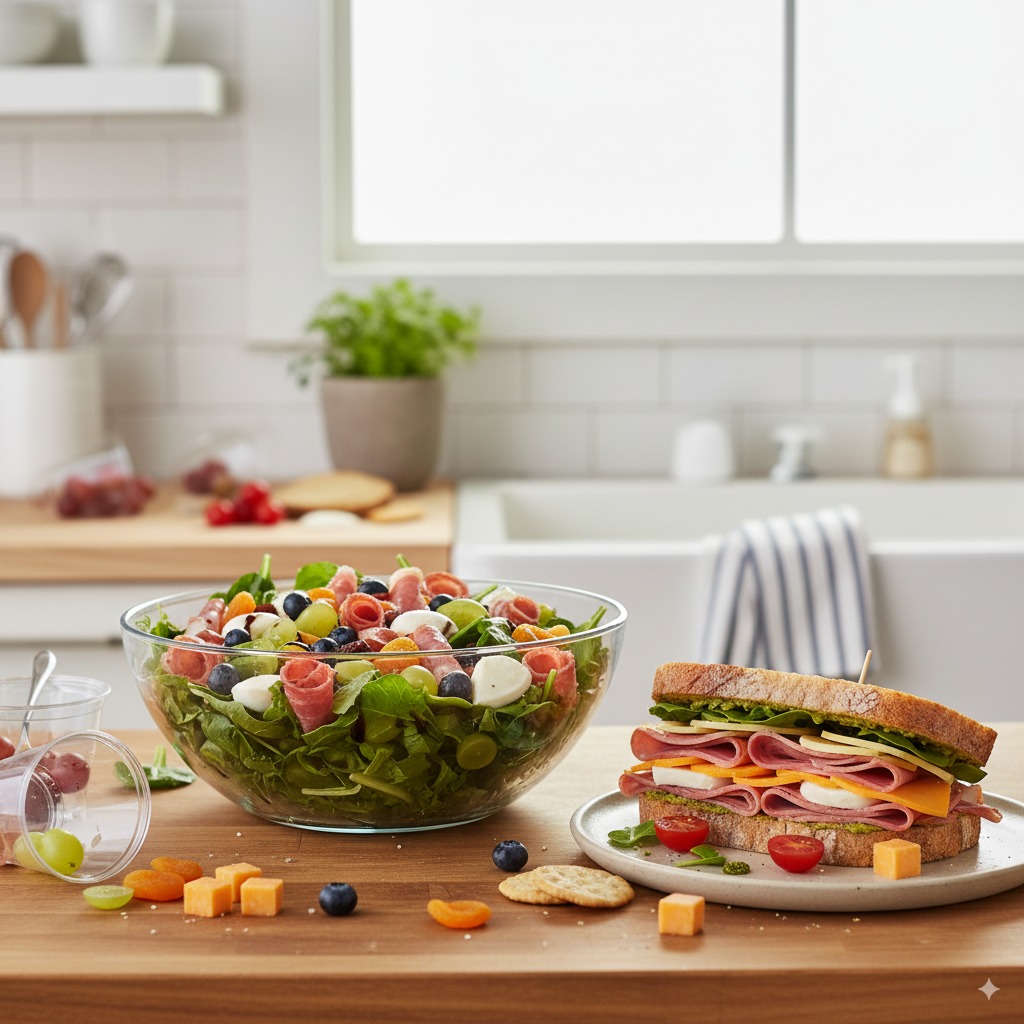
Let’s be honest – you’ve probably scrolled through Instagram, seen those picture-perfect charcuterie boards, and thought “Yeah, right, like I have three hours to arrange salami roses.” Well, friend, I’ve got news for you. Charcuterie cups are the game-changer you’ve been waiting for. They’re portable, portion-controlled, and honestly? Way easier than trying to make your cheese look like it belongs in a museum.
I discovered charcuterie cups during one of those “oh crap, people are coming over in two hours” moments we’ve all had. You know the drill – you promised to bring something impressive, but life happened. These little beauties saved my reputation that day, and I’m here to share the magic with you.
Why Charcuterie Cups Are Actually Genius

Before we jump into the how-to (see what I didn’t do there? No “diving” here!), let me convince you why these cups are brilliant. First off, no double-dipping drama. Everyone gets their own little paradise of deliciousness. Plus, they’re Instagram-ready without the stress of maintaining a beautiful board throughout your entire party.
Think about it – traditional charcuterie boards look amazing for about five minutes. Then someone grabs all the good cheese, crackers get scattered everywhere, and suddenly your masterpiece looks like a food truck explosion. Charcuterie cups? They stay gorgeous from start to finish.
Essential Supplies: What You Actually Need (Not What Instagram Says You Need)
The Cup Situation
Let’s start with the star of the show – the cups themselves. You’ve got options, and honestly, your choice here can make or break the whole operation.
Clear plastic cups (9-12 oz) are your best friend for beginners. I personally love the Hefty Clear Plastic Cups because they’re sturdy enough that you won’t have cup casualties, but clear enough to show off your handiwork. Pro tip: avoid the super cheap ones that crack if you look at them wrong.
For a fancier vibe, small mason jars work beautifully. The Ball Mason Jars 8oz are perfect – just the right size and way more sustainable if you’re the eco-conscious type.
The Good Stuff Inside
Here’s where it gets fun. You don’t need to break the bank, but quality matters more than quantity:
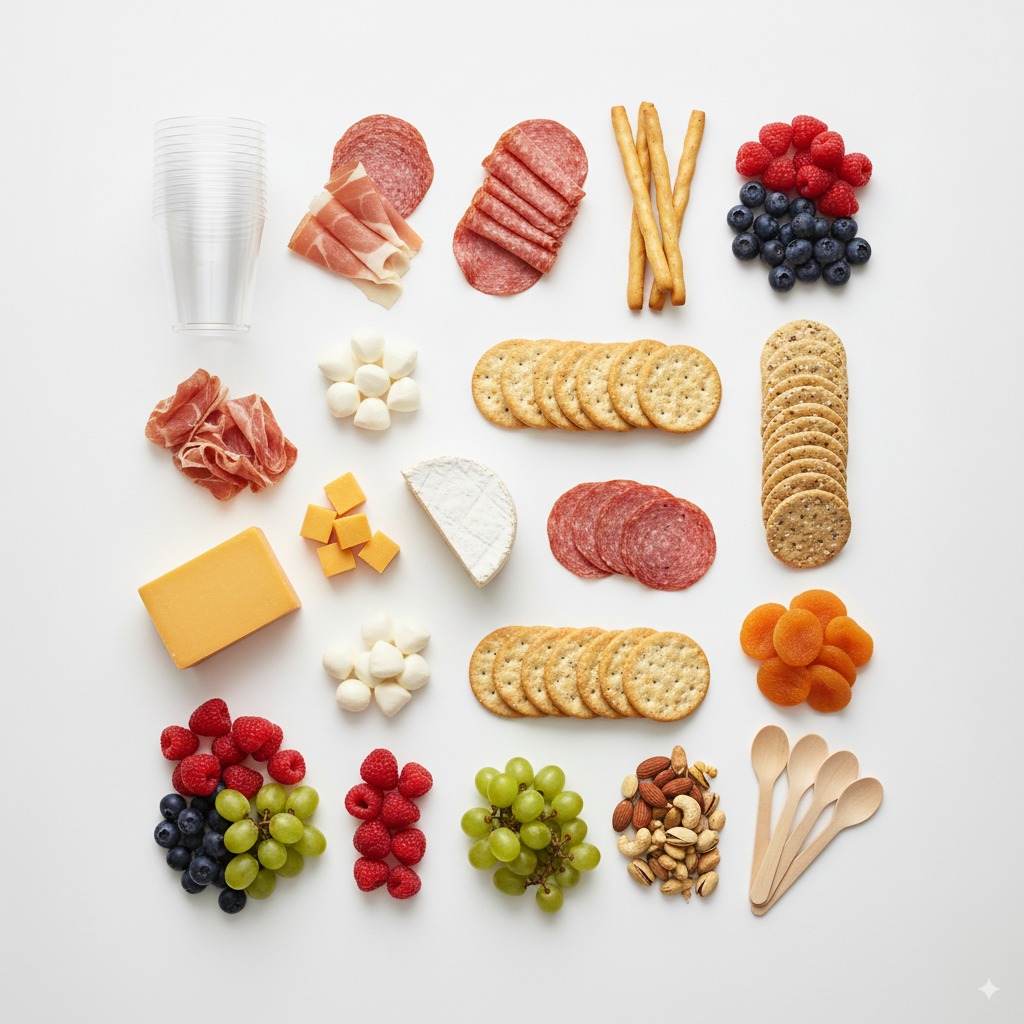
Meats (pick 2-3):
- Salami (classic for a reason)
- Prosciutto (fancy but not scary)
- Turkey or ham (for the less adventurous folks)
- Pepperoni (crowd-pleaser, don’t @ me)
Cheeses (2-3 varieties):
- Sharp cheddar cubes
- Brie or camembert
- Goat cheese (creamy and spreadable)
- String cheese (yes, really – cut it up, it’s great)
The Supporting Cast:
- Crackers (get the Carr’s Water Crackers – trust me on this)
- Fresh grapes
- Cherry tomatoes
- Nuts (almonds or walnuts)
- Olives (green or kalamata)
- Mini pickles
Tools You’ll Actually Use
Keep it simple, folks. You need:
- Sharp knife for cutting
- Small spoons for spreading
- Small bowls for organizing ingredients
- Cutting board
That’s it. No special charcuterie knives or fancy spreaders required.
Step-by-Step: Building Your Charcuterie Cups Like a Pro
Step 1: Prep Like Your Sanity Depends on It
Here’s the thing nobody tells you – prep is everything. I learned this the hard way when I tried to assemble 20 cups while guests were arriving. Not fun.
Cheese prep: Cut your hard cheeses into bite-sized cubes. For soft cheeses like brie, either cube them or leave them spreadable – your call. Pro tip: Let cheese come to room temperature for about 30 minutes before serving. Cold cheese is sad cheese.
Meat prep: If you’re using salami or pepperoni, you can fold slices into quarters for easy grabbing. Prosciutto looks fancy when you bunch it up a little (like you meant to do it that way).
Fruit and veggie prep: Wash grapes and cherry tomatoes. Pat them dry – nobody wants soggy cups.
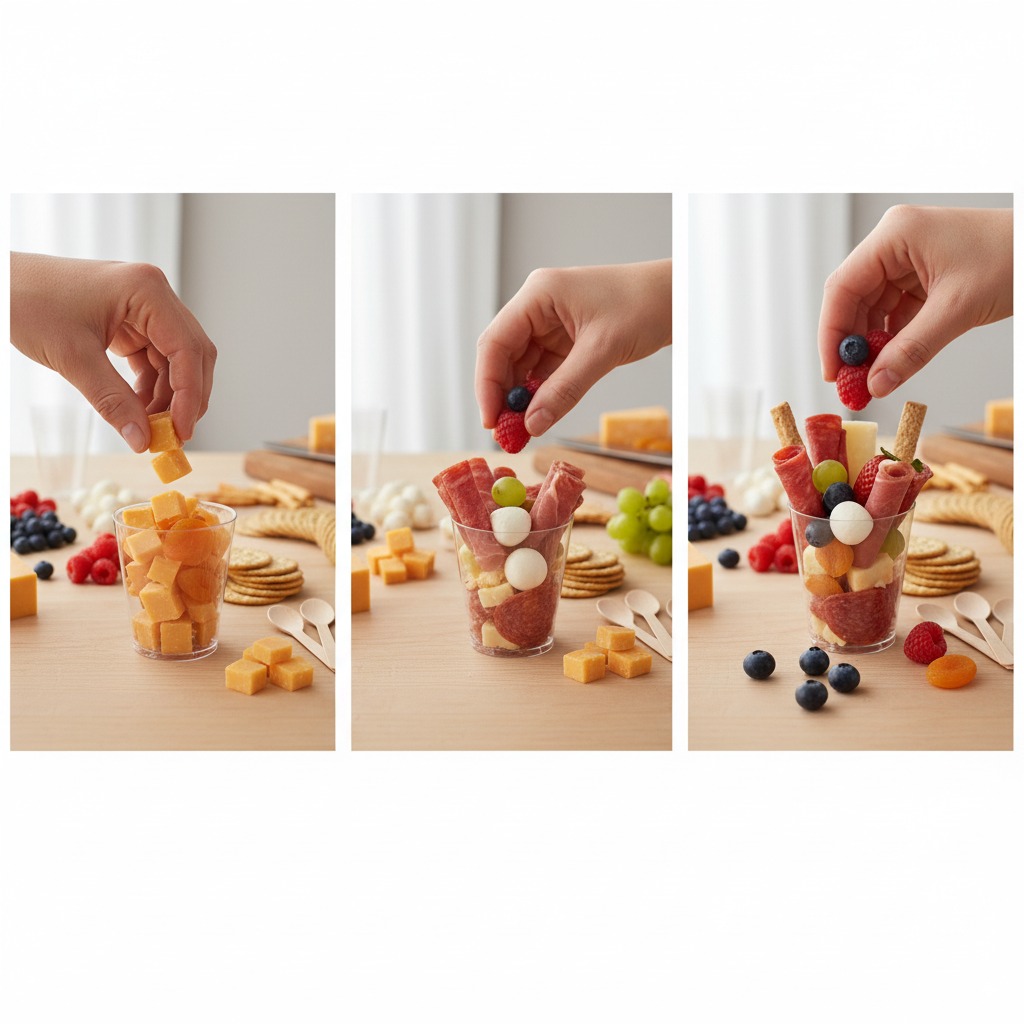
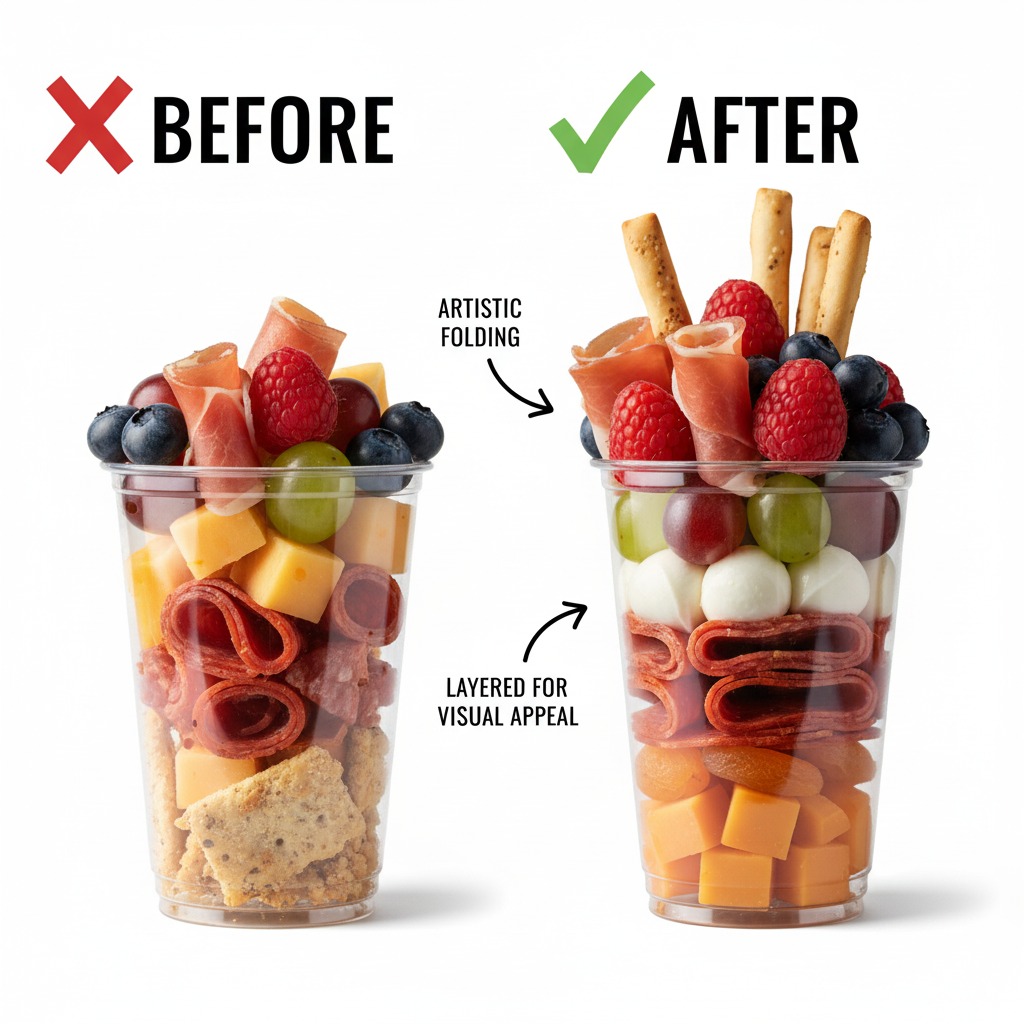
Step 2: The Layering Strategy That Actually Works

This is where the magic happens, and honestly, where most people overthink it. Here’s my foolproof method:
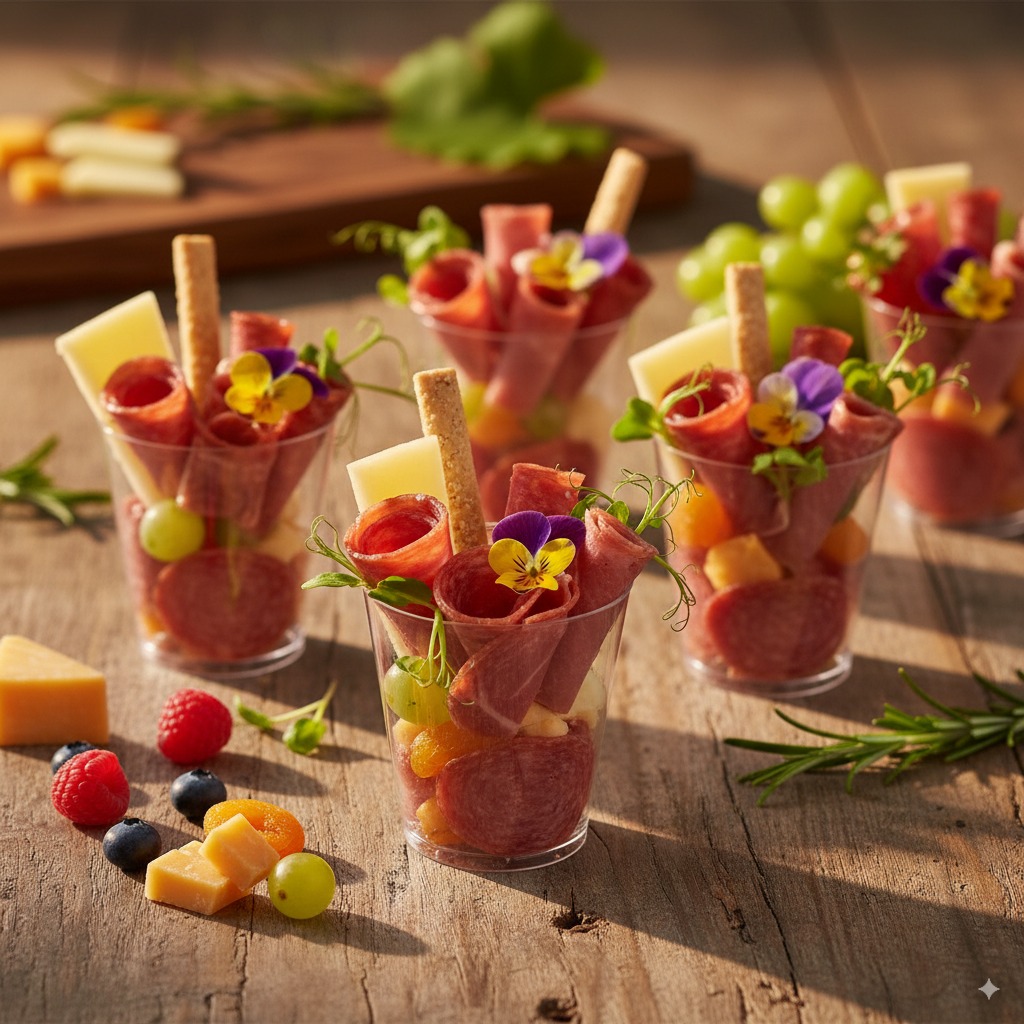
Bottom layer: Start with something sturdy. I usually go with crackers or a small piece of cheese. This creates your foundation and prevents everything from sliding around like it’s auditioning for a food avalanche.
Middle layer: This is your protein paradise. Add your meats here – fold that salami, bunch that prosciutto, make it look intentional.
Top layer: Fresh and colorful stuff goes here. Grapes, cherry tomatoes, olives. This is what people see first, so make it pretty.
The finishing touch: Sprinkle some nuts or add a small cracker standing up for height. A tiny sprig of rosemary makes everything look like you went to culinary school (you didn’t, but they don’t need to know that).
Step 3: The Assembly Line Method
Want to know how I make 30 cups without losing my mind? Assembly line, baby. Set up all your cups in rows and work one ingredient at a time across all cups. First, add crackers to every cup. Then move on to cheese, then meat, and so on.
This method is way faster than completing one cup at a time, and you’ll get more consistent results. Plus, you’ll feel like you’re running a very tiny, very delicious factory.
Advanced Tips That’ll Make You Look Like a Charcuterie Wizard
The Color Game
Ever wonder why some charcuterie setups look like they belong in a magazine while others look like a grocery store exploded? It’s all about color balance. Aim for at least three different colors in each cup. Red (tomatoes, salami), white (cheese, crackers), green (grapes, olives), and you’re golden.
Texture Matters More Than You Think
Mix up your textures – creamy cheese, crunchy nuts, smooth grapes, crispy crackers. Your mouth wants variety, and texture is how you deliver it without going overboard on ingredients.
The Height Trick
Here’s a secret that’ll make your cups look professional: vary the heights. Stick a cracker vertically, let some grapes peek over the rim, make some ingredients taller than others. Flat arrangements look amateur. Dimensional arrangements look intentional.
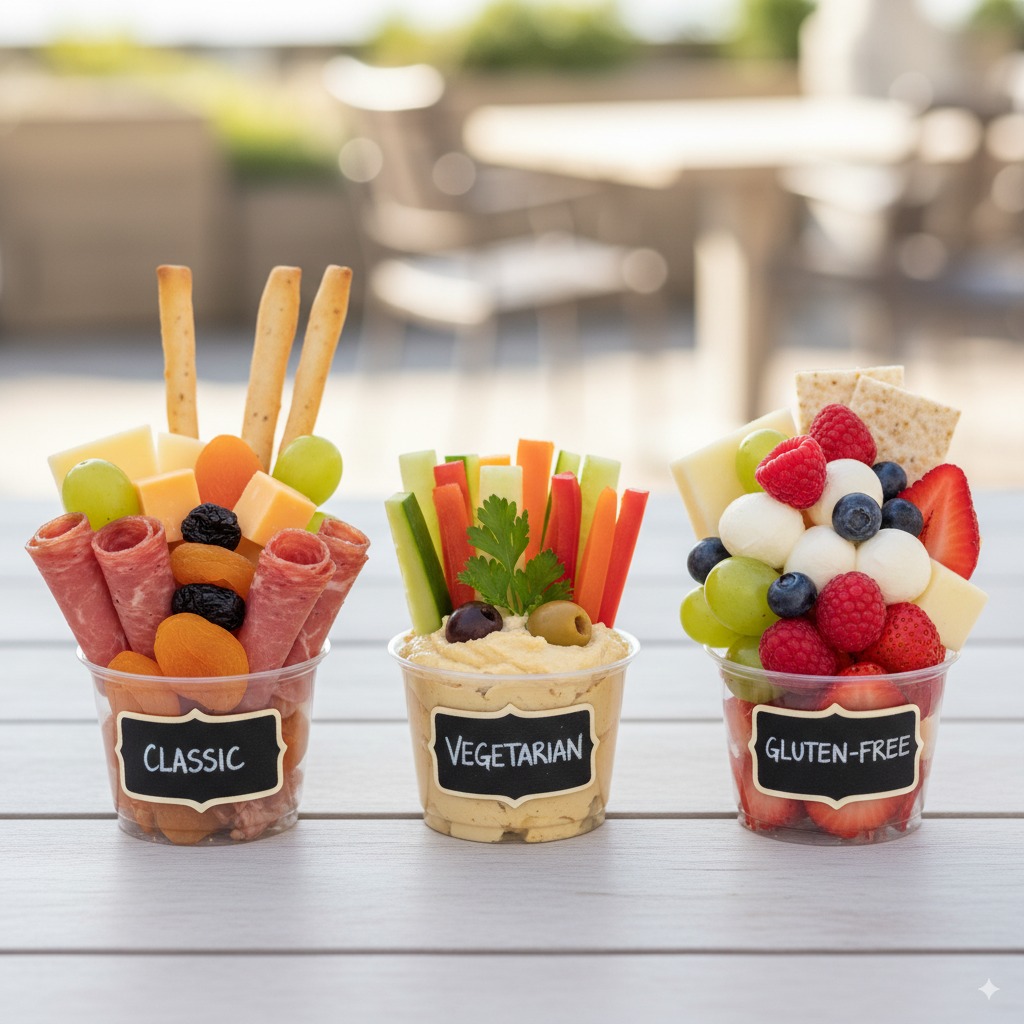
Dietary Restrictions? No Problem
Let’s talk about keeping everyone happy, because there’s always someone with dietary needs (and honestly, good for them).
Vegetarian Cups
Skip the meat, double the cheese. Add hummus as your protein – the Sabra Classic Hummus Individual Cups are perfect for this. Load up on nuts, fresh veggies, and maybe some hard-boiled egg if your vegetarians do eggs.
Gluten-Free Options
Swap crackers for cucumber rounds or bell pepper slices. They’re crunchy, fresh, and nobody misses the wheat. Rice crackers work too if you want something more traditional.
Keto-Friendly Cups
These are actually easier than regular cups. More meat, more cheese, skip the crackers. Add avocado, olives, and nuts. Your keto friends will love you forever.
Presentation Hacks That Don’t Require Art School
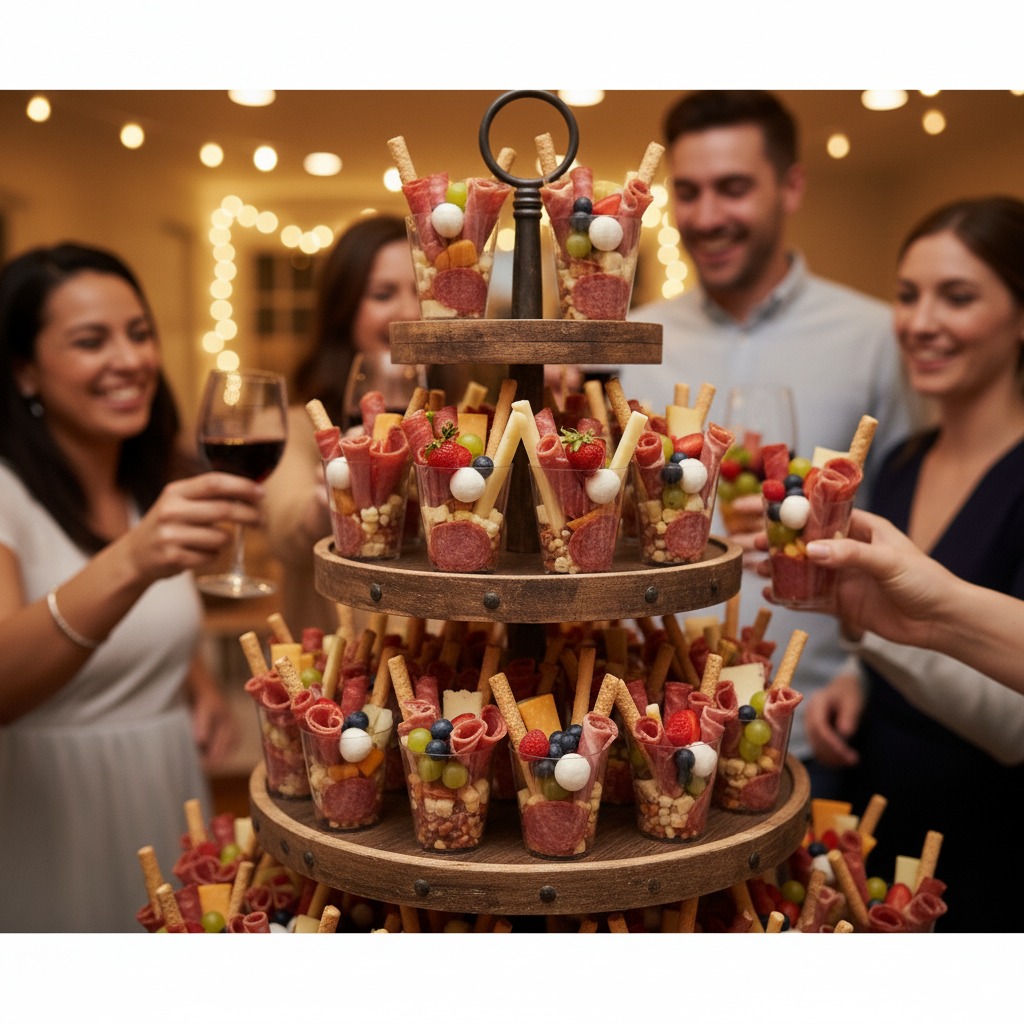
The Serving Setup
Don’t just plop your cups on a table and call it a day. Create levels using cake stands, books covered with cloth, or tiered serving trays. The 3-Tier Serving Stand I use makes everything look intentional and fancy.
Labels Are Your Friend
Small chalkboard labels or even sticky notes help guests identify what they’re grabbing. This is especially important if you have allergen concerns or just want to look super organized.
The Napkin Strategy
Put napkins everywhere. Seriously. More than you think you need. Charcuterie is delicious but messy, and nothing ruins a party like someone walking around with greasy fingers looking for a napkin.
Make-Ahead Magic: How to Prep Without Stress
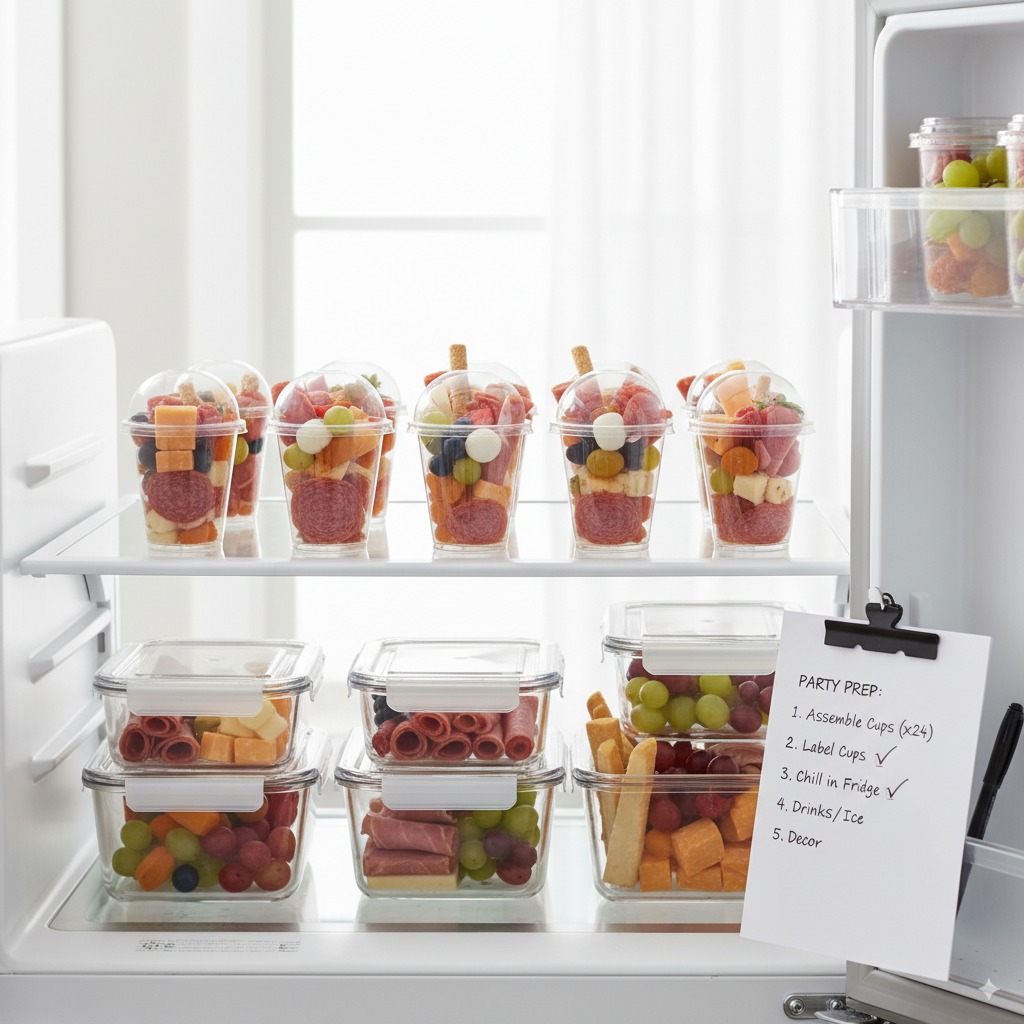
Here’s the beauty of charcuterie cups – you can prep them hours ahead. I usually assemble mine the morning of a party and just cover them with plastic wrap.
What holds up well:
- Hard cheeses
- Cured meats
- Crackers (if you add them last)
- Grapes
- Cherry tomatoes
What to add last minute:
- Soft cheeses (they can get weird)
- Cut avocado (hello, brown city)
- Anything that might get soggy
Storage tip: Keep them in the fridge until about 20 minutes before serving. Nobody wants warm cheese unless it’s melted cheese, and that’s a different article entirely.
Cost-Effective Shopping: Getting Fancy on a Budget
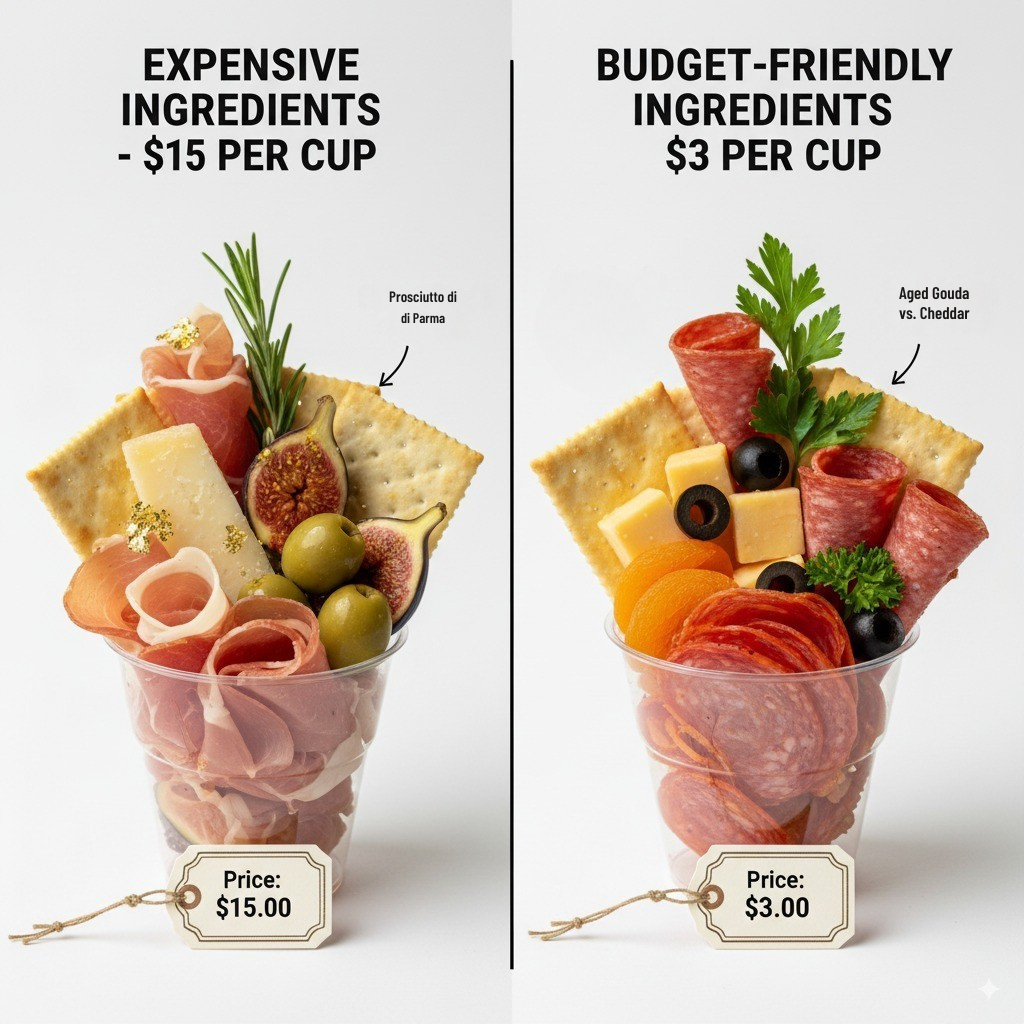
Let me be real with you – charcuterie ingredients can get expensive fast. But you don’t need to spend your mortgage payment to impress people.
Where to Splurge
Good cheese is worth the investment. Skip the processed stuff and get real cheese from the deli counter. It doesn’t have to be imported from a French hillside, but it should taste like actual cheese.
Where to Save
Store-brand crackers are fine. Seriously. Nobody’s going to judge your party based on cracker brand loyalty. Same goes for nuts – the store brand almonds taste the same as the fancy ones.
Seasonal shopping is your friend. Grapes in summer, pomegranate seeds in fall. Work with what’s cheap and in season.
Troubleshooting Common Charcuterie Cup Disasters
The Soggy Bottom Blues
This happens when wet ingredients (looking at you, fresh mozzarella) make everything else sad and mushy. Solution: Pat everything dry and use paper towel barriers if needed.
The Toppling Tower
Built too high and everything falls over? Scale it back. Your cups should be full but stable. Nobody wants to chase olives across the floor.
The Boring Brown Syndrome
Everything looks beige and sad? Add color intentionally. Bright red tomatoes, green grapes, yellow cheese. Color makes everything more appetizing.
Seasonal Variations That’ll Keep Things Interesting
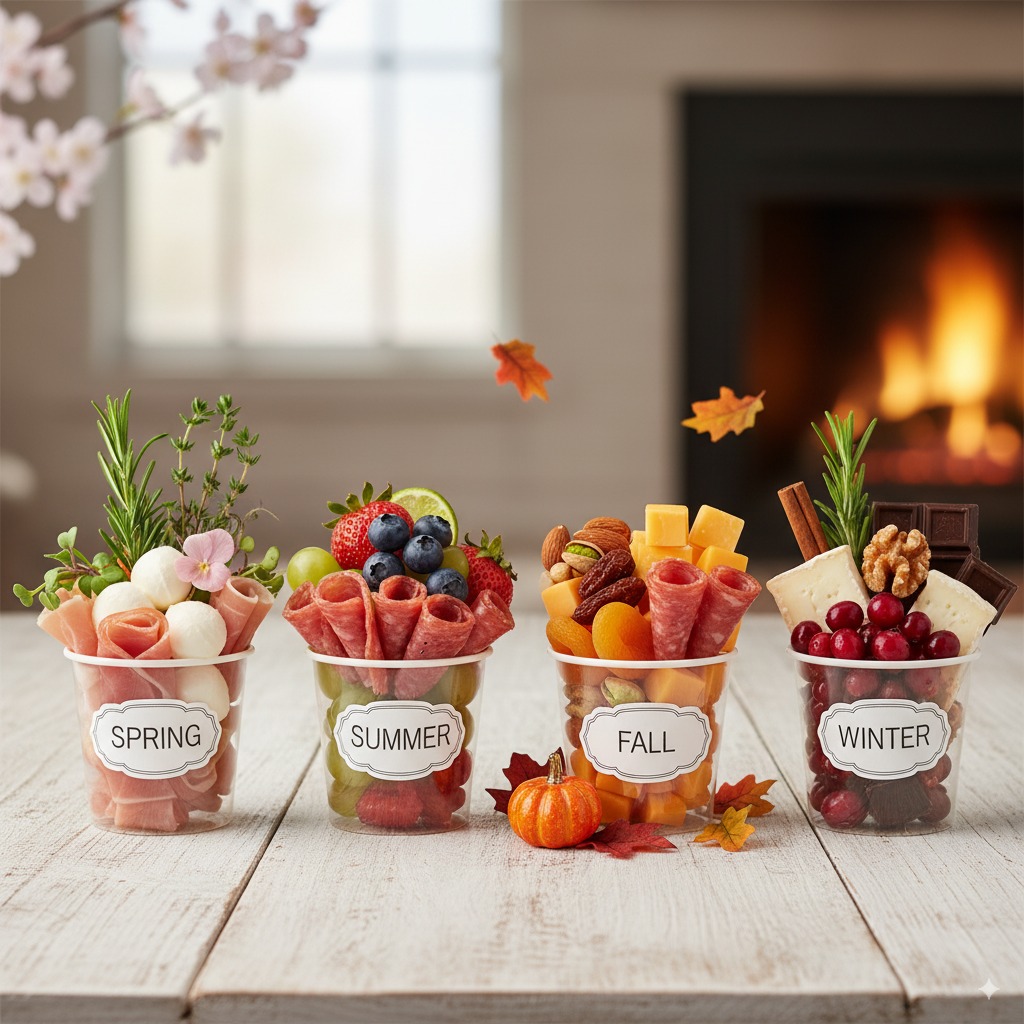
Spring Cups
Add fresh herbs like basil or mint, strawberries, and lighter cheeses. Everything feels fresh and new.
Summer Cups
Stone fruits are your friend – peaches, apricots, plums. Pair with prosciutto and soft cheeses for a dreamy combination.
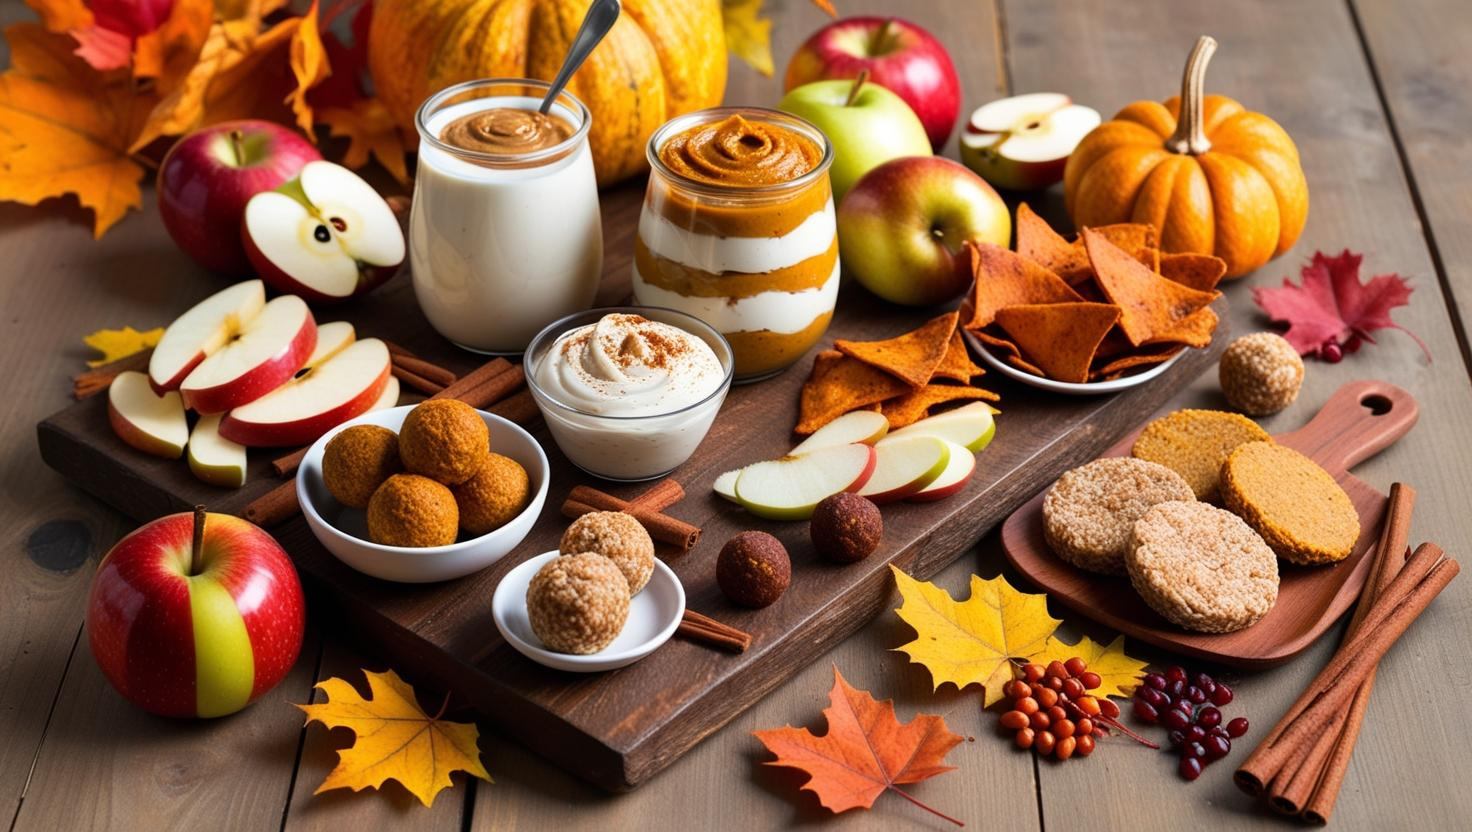
Fall Cups
Think dried fruits, nuts, and heartier cheeses. Add some pumpkin seeds for crunch and seasonal flair.
Winter Cups
Cranberries, pomegranate seeds, and maybe some chocolate if you’re feeling rebellious. Pair with aged cheddar and salami.
The Social Media Factor: Making Your Cups Instagram-Worthy
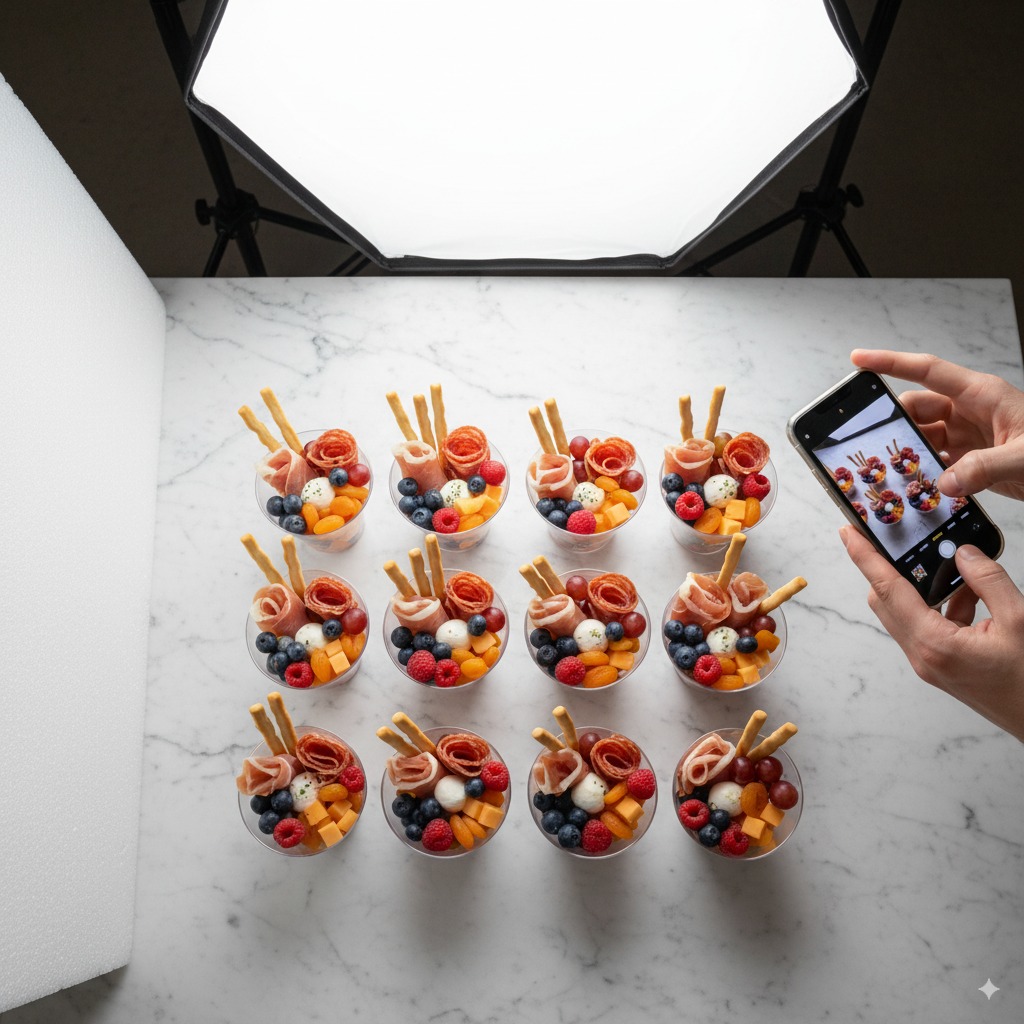
Let’s be honest – if you didn’t post it, did you really make charcuterie cups? Here’s how to make yours photo-ready:
Natural light is everything. Take photos near a window, not under harsh kitchen lights. Props matter – scattered ingredients, a wooden board, maybe some flowers in the background.
The overhead shot is classic for a reason. Clean your surface, arrange your cups in a pattern, and shoot straight down. Use portrait mode if your phone has it for that fancy blurred background effect.
Beyond the Basic: Creative Variations
Image Prompt: Creative charcuterie cup variations including breakfast cups with bagel pieces, dessert cups with chocolate and fruits, and themed cups for different occasions.
Breakfast Charcuterie Cups
Who says charcuterie is only for wine time? Mini bagel pieces, cream cheese, lox, and capers make an elegant brunch option.
Dessert Charcuterie Cups
Chocolate, berries, nuts, and maybe some small cookies. It’s like a cheese board’s sweet cousin, and equally impressive.
Theme Cups
Taco Tuesday cups with tortilla chips, salsa, cheese, and guacamole. Italian cups with mozzarella, basil, tomatoes, and salami. The possibilities are endless, and themes make planning easier.
Hosting Tips That’ll Make You Look Like a Pro
Image Prompt: Host serving charcuterie cups to guests at a party, everyone smiling and socializing, warm lighting, comfortable home setting.
Quantity Planning
Plan for 1-2 cups per person if they’re appetizers, 2-3 if they’re the main attraction. Always make a few extra – someone always wants seconds.
Timing Is Everything
Serve at room temperature for best flavor. Take them out of the fridge about 20 minutes before guests arrive.
The Beverage Pairing Game
Wine is obvious, but craft beer, sparkling water with fruit, or signature cocktails work beautifully too. Match the formality of your drinks to your cups.
Storage and Leftover Magic
Got leftovers? (Unlikely, but it happens.) Leftover ingredients make amazing salads, sandwiches, or pasta additions. Nothing goes to waste in the charcuterie cup world.
Store assembled cups covered in the fridge for up to 24 hours. After that, ingredients start getting weird together, and nobody wants that.
The Final Verdict: Why Charcuterie Cups Win
Here’s what I love most about charcuterie cups – they make entertaining approachable. You don’t need to be Martha Stewart or have a perfect kitchen. You just need good ingredients, a little creativity, and the willingness to try something new.
They’re perfect for everything from casual game nights to fancy dinner parties. Kids love them (customize with their favorites), adults feel sophisticated eating them, and you get to look like you’ve got your life together without actually having your life together. Win-win-win.
The best part? Once you master the basic formula, you can customize endlessly. Different themes, seasonal ingredients, dietary accommodations – the world is your charcuterie cup oyster (though please don’t put actual oysters in cups, that’s just weird).
So next time someone suggests bringing appetizers, skip the stress of a traditional charcuterie board. Make these cups instead. Your guests will be impressed, you’ll stay sane, and everyone gets their own perfect little portion of deliciousness.
And hey, if you’re looking for more charcuterie inspiration, check out these 20 easy charcuterie board ideas for beginners or learn how to build a charcuterie board with easy tips for busy moms – because sometimes you want the full board experience too.
Trust me on this one – charcuterie cups are about to become your new party trick. You’re welcome 🙂
Please save this pin for later

Frequently Asked Questions About Charcuterie Cups
How far in advance can I make charcuterie cups?
You can prepare charcuterie cups up to 24 hours in advance. Assemble them the morning of your event and store covered in the refrigerator. Add delicate items like soft cheeses and avocado just before serving for best results.
What size cups work best for charcuterie cups?
9-12 oz clear plastic cups or 8 oz mason jars are ideal for charcuterie cups. This size provides enough space for layering ingredients while maintaining proper portion control for appetizers.
How many charcuterie cups should I make per person?
Plan for 1-2 cups per person if serving as appetizers alongside other food, or 2-3 cups per person if they’re the main attraction. Always make a few extra as they tend to be popular.
Can I make vegetarian charcuterie cups?
Absolutely! Replace meats with hummus, hard-boiled eggs, extra cheese, nuts, and fresh vegetables. Use cucumber rounds or bell pepper slices instead of crackers for a fresh crunch.
What’s the best way to layer ingredients in charcuterie cups?
Start with sturdy items on the bottom (crackers, hard cheese), add proteins in the middle (meats, soft cheeses), and finish with colorful fresh items on top (grapes, tomatoes, olives) for visual appeal.
How do I prevent charcuterie cups from getting soggy?
Pat all ingredients dry before assembling, especially fresh tomatoes and mozzarella. Use paper towel barriers between wet and dry ingredients if necessary, and avoid adding very wet items like fresh mozzarella until just before serving.
What are the best cheeses for charcuterie cups?
Sharp cheddar, brie, goat cheese, and aged manchego work excellently. Choose a mix of hard and soft cheeses for variety. Cube hard cheeses and keep soft cheeses spreadable for easy eating.
Can charcuterie cups be made gluten-free?
Yes! Replace crackers with cucumber rounds, bell pepper slices, or gluten-free rice crackers. Focus on meats, cheeses, fruits, vegetables, and nuts for naturally gluten-free options.
What’s the most cost-effective way to make charcuterie cups?
Shop seasonal ingredients, buy cheese from the deli counter, use store-brand crackers and nuts. Splurge on quality cheese and meats while saving on basics like crackers and nuts.
How should I store leftover charcuterie cup ingredients?
Refrigerate assembled cups for up to 24 hours covered. Use leftover ingredients in salads, sandwiches, or pasta dishes. Store individual ingredients separately for longer shelf life.