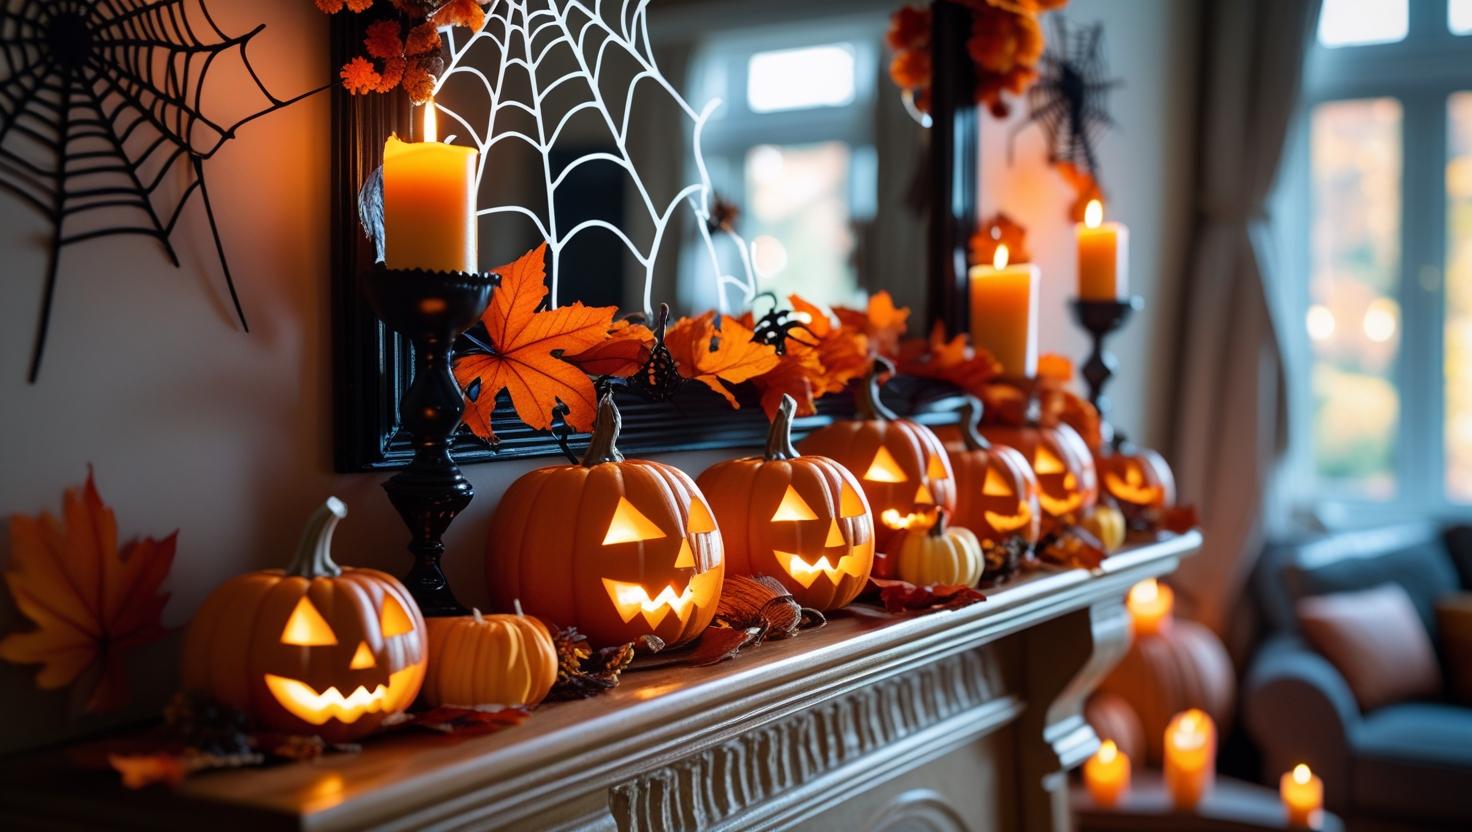
Hey mama! Are you ready to transform your mantel into a stunning fall Halloween display without breaking the bank? I’m spilling all my secrets for creating that perfect cozy autumn vibe using simple dollar store finds that won’t have you stressed about the budget.

Why Dollar Store Halloween Decorating is Perfect for Busy Moms
Let’s be honest – between school pickup, soccer practice, and trying to remember if we fed the dog breakfast, spending hours crafting elaborate Halloween decorations just isn’t realistic. But here’s the thing: you don’t need to spend a fortune or dedicate your entire weekend to create a mantel that looks like it belongs in a magazine.
I discovered this truth last October when I was standing in the dollar store with my toddler having a meltdown in the cart (you know the one – the “I-want-that-candy-NOW” meltdown). Instead of rushing through like I usually do, I actually took a moment to really look around. And wow, the seasonal section was packed with adorable finds that I knew I could transform into something special.
The best part? Everything I’m about to share with you can be done in under two hours, costs less than $25, and requires zero special skills. If I can do it while my kids are “helping” (translation: making it take three times longer), you definitely can too.

Essential Dollar Store Halloween Mantel Supplies
Before we dive into the styling magic, let’s talk about what you’ll need. I always recommend making a quick list before heading to the dollar store – trust me, it’s easy to get distracted by all the cute seasonal stuff and come home with everything except what you actually need.
Your Dollar Store Shopping List:
- Mini pumpkins (orange, white, and if you’re lucky, those trendy blue-green ones)
- Artificial autumn leaves in various colors
- Battery-operated string lights (warm white or orange)
- Small glass vases or mason jars
- Fabric autumn garland or ribbon
- Plastic or foam pumpkins in different sizes
- Autumn-colored candles (battery-operated for safety with kids)
- Small Halloween figurines (think cute, not scary)
- Burlap or textured fabric remnants
- Wooden or plastic autumn signs
Pro Mom Tip: If your Dollar Store is anything like mine, they restock seasonal items on Tuesdays. I’ve learned to pop in mid-week for the best selection, especially for those coveted mini pumpkins that disappear faster than my patience during homework time.
Step-by-Step Dollar Store Halloween Mantel Styling Guide
Step 1: Create Your Foundation Layer
Start with a clean mantel – I know, I know, easier said than done when you’re constantly moving random kid toys and school papers. But trust me, starting with a blank slate makes all the difference.
Lay down your burlap or textured fabric as a runner. This instantly adds warmth and texture without looking too “crafty.” I love how burlap gives that cozy farmhouse vibe that’s perfect for fall. If you can’t find burlap, even a fall-colored table runner from the dollar store works beautifully.
Next, add your garland. I like to drape it casually rather than making it perfectly symmetrical – we’re going for that “effortlessly styled” look, not “Pinterest perfectionist.” Let it drape naturally, with some pieces hanging lower than others.

Step 2: Add Height and Visual Interest
This is where those different-sized pumpkins come in handy. Think of your mantel in thirds – you want to create varying heights across the space. Place your largest pumpkin slightly off-center (remember, we’re not going for perfect symmetry here).
Add smaller pumpkins at different heights by placing some on small boxes or books wrapped in fall-colored paper. This creates that layered look that makes everything feel more intentional and visually interesting.
Dollar Store Hack: Those foam pumpkins are perfect for this because they’re lightweight and won’t fall off easily if little hands decide to “help” with your decorating.
Step 3: Incorporate Warm Lighting
Nothing says “cozy fall evening” like warm, soft lighting. String your battery-operated lights throughout the garland and around the larger pumpkins. The key is to keep the lights visible but not overwhelming – we want a gentle glow, not a Christmas tree situation.
If you found those cute little lanterns at the dollar store, now’s the time to use them. Place battery-operated tea lights inside for extra ambiance. They look especially magical when the sun starts setting and you’re trying to get dinner on the table while the kids are asking for the millionth time when Halloween is coming.

Step 4: Fill in with Natural Elements
Those artificial autumn leaves are about to become your best friend. Tuck them around the base of your pumpkins, weave them through the garland, and scatter a few on the mantel itself. This adds that organic, just-gathered-from-the-yard feel without actually having to rake leaves (because let’s be honest, we have enough yard work to do).
Don’t be afraid to let some leaves “fall” naturally – this adds to the authentic autumn vibe and honestly, if a few more fall off throughout the season, it just adds to the natural look.

Budget-Friendly Halloween Mantel Styling Tips
The Rule of Odd Numbers
I learned this trick from a decorator friend, and it’s been a game-changer for my seasonal decorating. When arranging items, use odd numbers – three pumpkins look more natural than two or four. Five candles create better visual flow than six. It sounds weird, but trust me on this one.
Mix Textures for Visual Interest
This is where those different dollar store finds really shine. The smooth plastic pumpkins next to the rough burlap, the delicate artificial leaves against the rustic wood signs – these contrasts make everything look more expensive and intentional.
Pro Mom Tip: If you have any real mini pumpkins from the grocery store, mix them in with the artificial ones. No one will be able to tell the difference, and it adds that authentic touch we’re all after.
Don’t Forget the Vertical Space
Use the wall space above your mantel too! A simple fall wreath or seasonal wall hanging from the dollar store can tie everything together. Just make sure it’s proportional to your mantel display – you don’t want it competing for attention.

Easy Dollar Store Halloween Mantel Variations
The Minimalist Approach
If you’re more of a “less is more” person (or if you’re just too tired to deal with lots of little pieces), focus on just a few key elements. A beautiful fall garland, three different-sized pumpkins, and some warm lighting can create a stunning display that’s still budget-friendly and low-maintenance.
The Kid-Friendly Version
Got little ones who love Halloween? Add some of those cute (not scary) Halloween figurines – maybe a friendly ghost or a smiling jack-o’-lantern. The dollar store usually has adorable options that won’t give anyone nightmares but still capture that Halloween spirit.
The Elegant Autumn Look
Want to skip the Halloween theme and go straight autumn? Focus on rich oranges, deep reds, and golden yellows. Use the same techniques but swap out any obviously Halloween items for more general fall elements like pinecones, acorns, or autumn berries.
Common Dollar Store Decorating Mistakes (And How to Avoid Them)
Mistake #1: Making Everything Match Perfectly
I know it’s tempting to buy everything in the exact same color family, but this actually makes your display look flat and boring. Mix in some unexpected colors – maybe a few white pumpkins among the orange ones, or some deep burgundy leaves with the traditional autumn colors.
Mistake #2: Overcrowding the Space
Just because you found amazing deals doesn’t mean everything needs to go on the mantel. Sometimes less really is more, and you want to leave some breathing room between elements.
Mistake #3: Forgetting About Scale
Make sure your decorations are proportional to your mantel size. A tiny mantel can look overwhelmed with too many large pieces, while a big mantel might look sparse with only small items.

Making Your Dollar Store Finds Look More Expensive
Add Personal Touches
This is where you can get a little creative without spending extra money. Maybe tie some raffia bows around the pumpkin stems, or add a few family photos in autumn-themed frames you found at the dollar store.
Layer Different Textures
We talked about this earlier, but it’s worth repeating – mixing textures is the secret to making everything look more expensive. That smooth plastic pumpkin next to a rough burlap ribbon creates visual interest that draws the eye.
Use What You Have
Don’t forget to shop your own house first! Those wooden bowls from your kitchen might be perfect for holding mini pumpkins. That cream-colored throw from your couch could be the perfect backdrop for your display.

Seasonal Storage Solutions for Your Dollar Store Decor
Let’s talk about the elephant in the room – what do you do with all this stuff when Halloween is over? As moms, we know storage space is precious, so here are some practical solutions:
Repurpose for Thanksgiving: Many of your fall elements can transition beautifully into Thanksgiving decor. Just remove the obviously Halloween items and add some thanksgiving-themed signs or turkey figurines.
Storage Bins by Season: I keep one clear storage bin for each season’s dollar store finds. Everything goes in there, and I can easily see what I have for next year.
Photo Documentation: Take a picture of your finished mantel before you take it down. Next year, you’ll have a reference photo and won’t have to remember how you arranged everything.
Safety Considerations for Family-Friendly Halloween Decorating
Since we’re decorating in homes with kids, safety is always a priority. Here are some mom-tested tips:
Battery-Operated Everything: Skip the real candles and go for battery-operated options. They look just as beautiful and you don’t have to worry about curious little fingers.
Secure Heavy Items: Make sure larger pumpkins and decorations are stable and won’t fall if bumped. I learned this the hard way when my toddler decided to “help” rearrange my beautiful display.
Non-Toxic Materials: Stick to decorations that are safe if little ones decide to explore with their mouths. The dollar store is pretty good about this, but it’s always worth checking.

Extending Your Dollar Store Halloween Mantel Throughout the Season
The beauty of using mostly fall elements with just a few Halloween-specific pieces is that you can easily transition your display. After Halloween, simply remove the jack-o’-lanterns and add some turkey figurines or “Thankful” signs for Thanksgiving.
Week 1-2 (Early October): Start with a general fall theme Week 3-4 (Mid-October): Add Halloween elements Week 5 (Halloween week): Go all out with spooky fun November: Remove Halloween items, add Thanksgiving touches
This approach maximizes your decorating budget and keeps your mantel looking fresh and seasonal for months.
Final Thoughts on Dollar Store Halloween Mantel Magic
Creating a beautiful fall Halloween mantel doesn’t have to be expensive, time-consuming, or stressful. With a little creativity and some strategic dollar store shopping, you can create a display that looks like you spent way more than you actually did.
Remember, the goal isn’t perfection – it’s creating a warm, welcoming space that makes your family smile when they walk into the room. If some leaves fall off or the pumpkins get moved around by little hands, that’s just part of the charm.
The most important thing is that you’re creating memories and traditions without breaking the bank or overwhelming your already busy schedule. Your kids will remember the cozy autumn feeling of your home, not whether everything was perfectly placed.

I hope this post has inspired you to create your own beautiful fall Halloween mantel! Remember, decorating should be fun, not stressful. Start with what you have, add a few dollar store finds, and let your creativity flow.
What’s your favorite dollar store seasonal find? I’d love to hear about your own budget-friendly decorating discoveries in the comments below!
Pin this post for later, and don’t forget to share photos of your own dollar store mantel creations – I love seeing how other moms make these ideas their own!