
15 Fun Easter Crafts for Kids and Parents to Create Together
Easter is such a special time to gather with family and create lasting memories. One of my favorite ways to capture those moments is through a Family Easter Scrapbook Project. It’s not just about photos; it’s about bringing together all the little things that made the day memorable, from the colorful eggs to the laughter shared during egg hunts. This DIY project is a fun way to preserve your family traditions and will surely become a treasured keepsake. Plus, if you’re looking for more creative ways to keep the kids entertained, be sure to check out this amazing list of 20 Fun DIY Crafts for Kids Using Household Items here.
Painted Rock Easter Decorations
Painted rock decorations are a fun and creative way to celebrate Easter. Families can gather some smooth rocks and transform them into charming Easter eggs. This activity is perfect for kids and parents to work together. It encourages creativity while adding a festive touch to your home.
The rocks can be painted in various colors and patterns, resembling traditional Easter eggs. You might find stripes, polka dots, flowers, and even personalized messages on each one. The variety keeps things exciting and allows everyone to express their individual styles.
Once the rocks are painted, they can be placed in your garden or around the house. Arranging them with some fresh flowers can create a lovely spring display. This not only brightens up your space but also brings a smile to everyone who sees it.

Spring Flower Paper Crafts
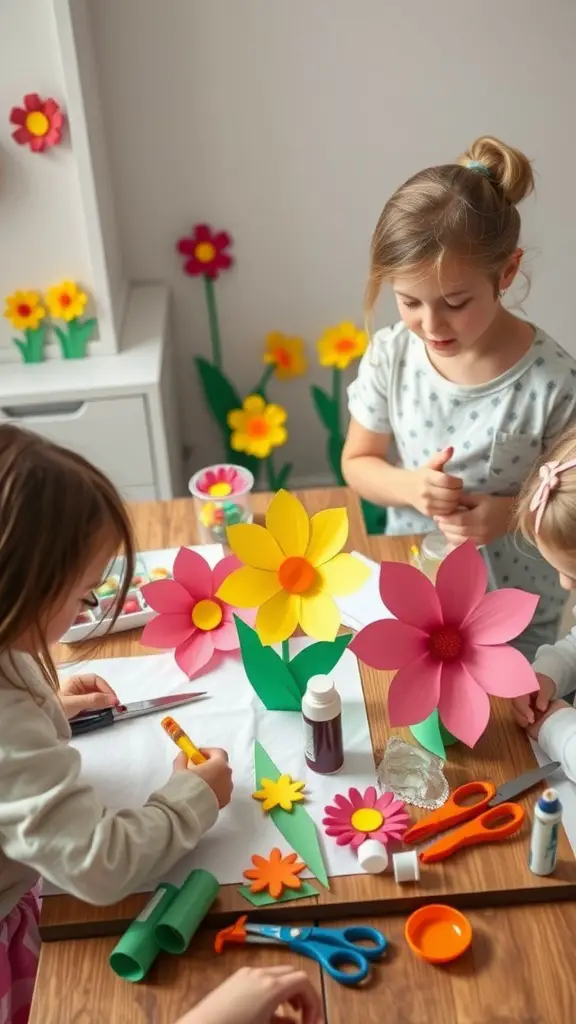
The image shows children happily engaged in creating vibrant paper flowers. They are using colorful materials like yellow, pink, and green paper. Scissors, glue, and markers are scattered across the table, making it a lively crafting scene.
This is a perfect spring activity, and it’s one of the many easter crafts for kids that families can enjoy together. Not only does this craft allow for creativity, but it also brings the joy of spring indoors.
Encouraging kids to use their imaginations, they can make flowers of various shapes and sizes. Helping them can turn this into a bonding experience, where you can share ideas and techniques. Plus, the finished products can serve as cheerful decorations for your home during Easter.

If you’re searching for a new game to spice up your family game nights, look no further than Golden Egg Quest! This Easter-themed board game is packed with surprises, challenges, and laughter, making it a hit for both kids and adults. Whether you’re racing to collect eggs or drawing fun egg cards, every game is a new adventure. Ready to play? Grab your copy here and let the fun begin!”
Handmade Bunny Ear Headbands
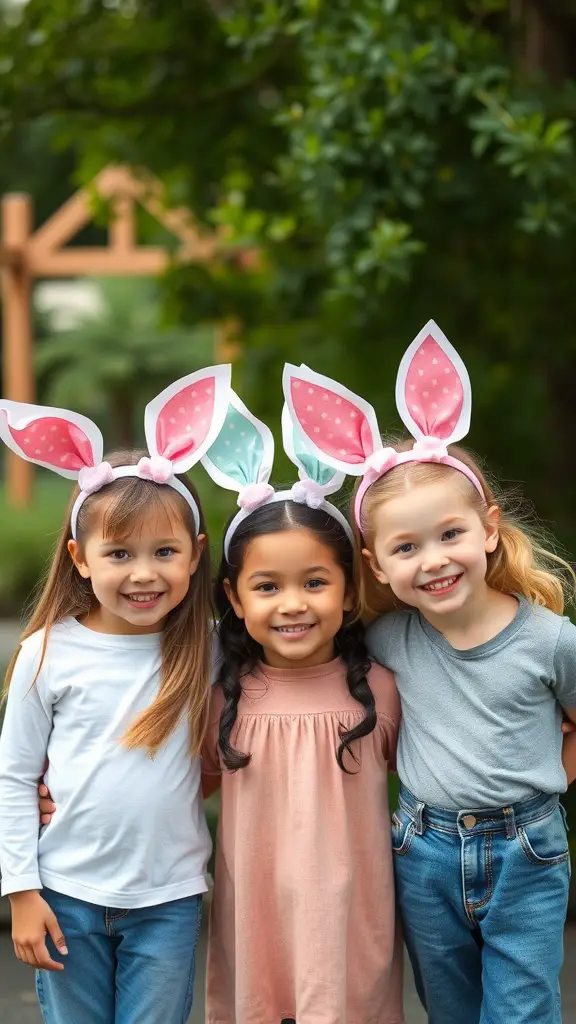
Making bunny ear headbands is a fun and simple craft that kids and parents can enjoy together this Easter. The image shows three happy kids wearing cute bunny ear headbands. Each headband has large, floppy ears in different colors, adding a festive touch to their outfits.
This craft encourages creativity. You can use colorful card stock for the ears, along with some elastic bands or ribbons to make the headbands fit comfortably. Add some pom-poms for tails or glitter for a fun sparkle effect!
These headbands are not just for decoration. Kids can wear them during egg hunts, family gatherings, or while enjoying other Easter activities. It’s a great way to celebrate the holiday together while making happy memories.
DIY Easter Egg Hunt Bags
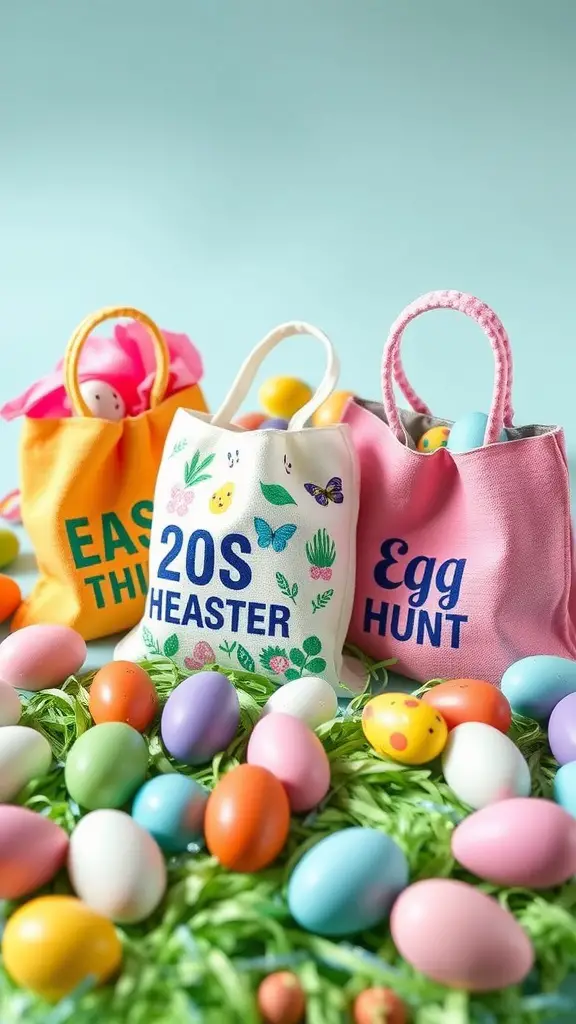
Creating your own Easter egg hunt bags is a fun way to kick off the holiday season. The image shows a vibrant setup with three cute bags, each labeled with playful phrases. They stand out against a colorful backdrop filled with Easter eggs and green grass, setting the stage for a perfect egg hunt.
These bags make the hunt even more exciting for kids. Each bag features unique designs, like butterflies and flowers, adding a personal touch. Grab some fabric or sturdy paper, colorful markers, and any decorations you like. Kids can decorate their bags however they want, making this an excellent project for parents and children to do together.
Letting kids choose their colors and designs encourages creativity. Once the bags are ready, fill them with plastic eggs, candy, or small toys. These DIY Easter egg hunt bags are not just functional; they’re a wonderful way to bond while engaging in some Easter crafts for kids.
Creative Egg Decorating with Stickers
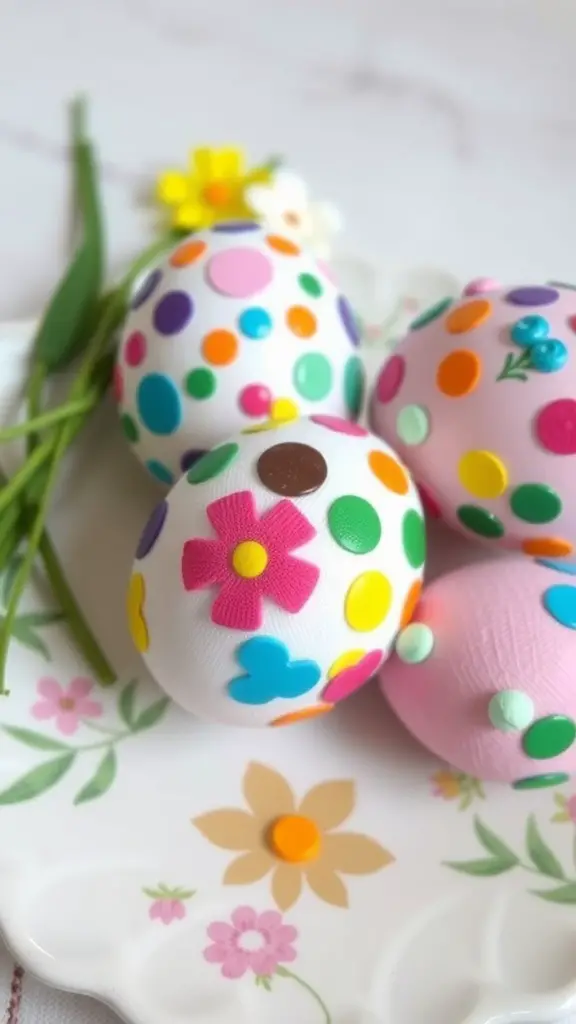
Egg decorating is a timeless tradition, and using stickers is a fun and mess-free way to get creative. Whether you’re crafting with kids or adding a modern twist to classic designs, stickers make it easy to personalize your eggs with endless possibilities. From glittery embellishments to themed patterns, it’s a simple yet beautiful way to celebrate the season!
Materials Needed:
- Hard-boiled or blown-out eggs
- A variety of stickers (e.g., glitter, foam, or themed designs)
- Optional: Dye or paint for colored eggs
- Tweezers (for precise sticker placement)
Instructions:
- Prepare the Eggs:
- Start with hard-boiled eggs or hollow eggs if you plan to keep them as decorations.
- If desired, dye or paint the eggs in solid colors for a vibrant background. Let them dry completely.
- Choose Stickers:
- Gather a variety of stickers that fit your theme, such as flowers, animals, Easter bunnies, or geometric patterns. Foam stickers add a 3D look, while glitter stickers make the eggs sparkle.
- Decorate the Eggs:
- Carefully peel and place the stickers on the eggs. Use tweezers for small or intricate designs to position them accurately.
- Create patterns, scenes, or random arrangements, depending on your style.
- Optional Embellishments:
- For extra flair, combine stickers with washi tape or adhesive gems.
- Add personalized names or messages using letter stickers.
- Display the Eggs:
- Place the finished eggs in a decorative basket, egg cups, or a nest of shredded paper for a festive display.
- Use as centerpieces or hide them for an Easter egg hunt.
Tips:
- Avoid placing stickers on wet or damp eggs, as they may not adhere well.
- Mix textures by combining smooth vinyl stickers with rougher paper stickers for contrast.
- Let kids choose their favorite stickers for a fun family activity.
Easter-Themed Friendship Bracelets
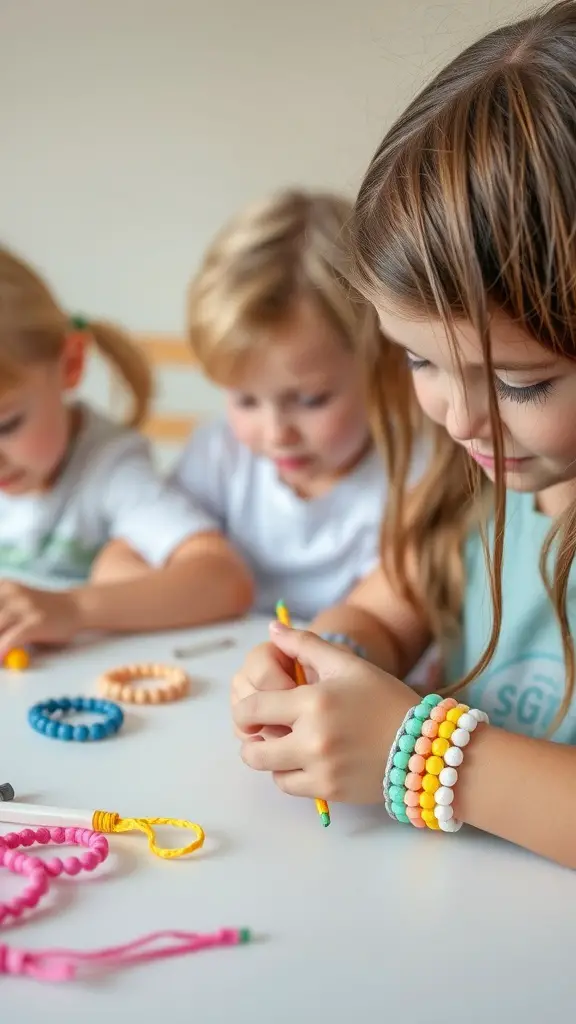
Easter-themed friendship bracelets are a fun and colorful way to celebrate the holiday with kids. In the image, you can see children engaged in making these lovely bracelets. Each child is focused, showing off their creativity with bright beads in various colors. The girl on the right has multiple bracelets on her wrist, highlighting the joy of making something special. This activity not only fosters teamwork but also helps kids express their individuality. Crafting these bracelets together can strengthen friendships and create lasting memories, making it one of the delightful easter crafts for kids to enjoy during this festive season.
Materials Needed
- Embroidery floss or yarn in pastel colors (e.g., pink, yellow, lavender, mint, and white).
- Small Easter-themed beads (bunny, egg, or flower shapes).
- Alphabet beads (optional for names or words like “Easter”).
- Scissors.
- Tape or clipboard to hold the bracelet while you work.
- Needle threader (optional, if threading beads is tricky).
Instructions
- Prepare Your Floss
- Cut 4–6 strands of embroidery floss, each about 24–30 inches long.
- Choose colors that remind you of Easter or spring.
- Secure Your Strands
- Tie a knot at one end, leaving about 2 inches of excess floss for tying later.
- Tape the knotted end to a table or clip it onto a clipboard.
- Create a Base Pattern
- Choose a simple braiding pattern, such as:
- Basic braid: Divide the strands into three sections and braid.
- Diagonal stripes: Use the candy stripe knotting technique.
- Work the bracelet to your desired length, stopping occasionally to add beads.
- Choose a simple braiding pattern, such as:
- Add Easter-Themed Beads
- String beads onto individual strands as you braid.
- Use a needle threader if the floss is hard to pass through the bead holes.
- Space the beads evenly or create a repeating pattern.
- Incorporate Alphabet Beads (Optional)
- Spell out names, “Easter,” or festive words like “Spring” or “Joy.”
- Finish the Bracelet
- When you reach the desired length, tie a secure knot at the end.
- Trim any excess floss, leaving enough to tie the bracelet around a wrist.
- Tie and Gift
- Wrap the bracelet around your wrist or a friend’s, and secure it with a double knot.
These bracelets are perfect for gifting, trading, or wearing as a cheerful reminder of Easter fun! 🐰🌸
Fluffy Cotton Ball Bunny Crafts
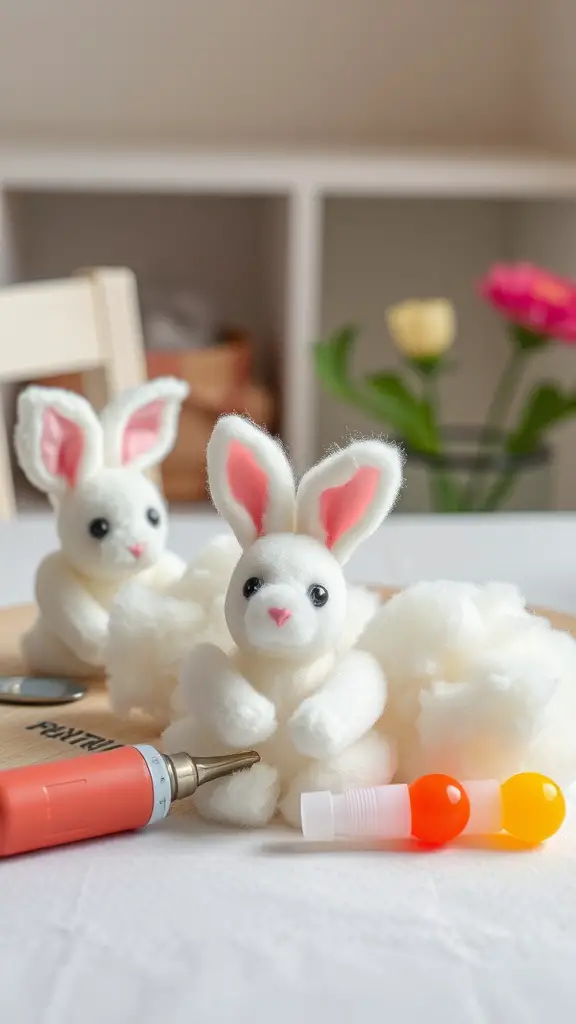
Creating fluffy cotton ball bunnies is a fantastic way to celebrate Easter with kids. These cute little bunnies are made using simple materials and bring joy to any crafting session. The image showcases adorable cotton ball bunnies, complete with sweet little faces and soft, fluffy bodies.
To get started, gather some cotton balls, colored felt for the ears, and googly eyes. You can also use glue and a small pair of scissors. Kids will love assembling the bunnies, sticking the ears on, and adding the eyes to create their very own fluffy friends.
This craft is not only a fun way to spend time together, but it also allows kids to express their creativity. They can personalize their bunnies with different colors or patterns. Displaying these creations during Easter will add a playful touch to your decorations.
Materials Needed
- Cotton balls (white or pastel-colored).
- Construction paper or cardstock (white, pink, and any other colors for accents).
- Glue (school glue or a glue stick).
- Scissors.
- Googly eyes or small black beads for eyes.
- Pink pom-poms or beads for the nose.
- Black marker or pen (for drawing details).
- Optional: Pipe cleaners for whiskers.
Instructions
- Create the Bunny Body
- Take a piece of construction paper or cardstock as the base.
- Glue cotton balls closely together to form a round or oval shape for the bunny’s body.
- Add more cotton balls on top to build a fluffy 3D effect.
- Make the Bunny Head
- Form another smaller oval or circle shape with cotton balls and glue it above the body to create the bunny’s head.
- Add Ears
- Cut two ear shapes out of white construction paper or cardstock.
- Cut smaller pink shapes to fit inside the white ears and glue them together.
- Attach the ears to the top of the bunny’s head by gluing them at the base.
- Add Facial Features
- Glue on googly eyes or small beads for the eyes.
- Use a pink pom-pom or bead for the nose.
- Optional: Cut short pieces of pipe cleaners for whiskers and glue them on either side of the nose.
- Finish with a Tail
- Glue a single cotton ball to the back of the bunny to act as its fluffy tail.
- Decorate (Optional)
- Add bows, small flowers, or any other embellishments to make your bunny extra festive!
These fluffy cotton ball bunnies are a simple, fun craft for kids and adults alike. Display them on shelves, tables, or as part of an Easter centerpiece! 🐰🌸
Egg Carton Chicks and Bunnies
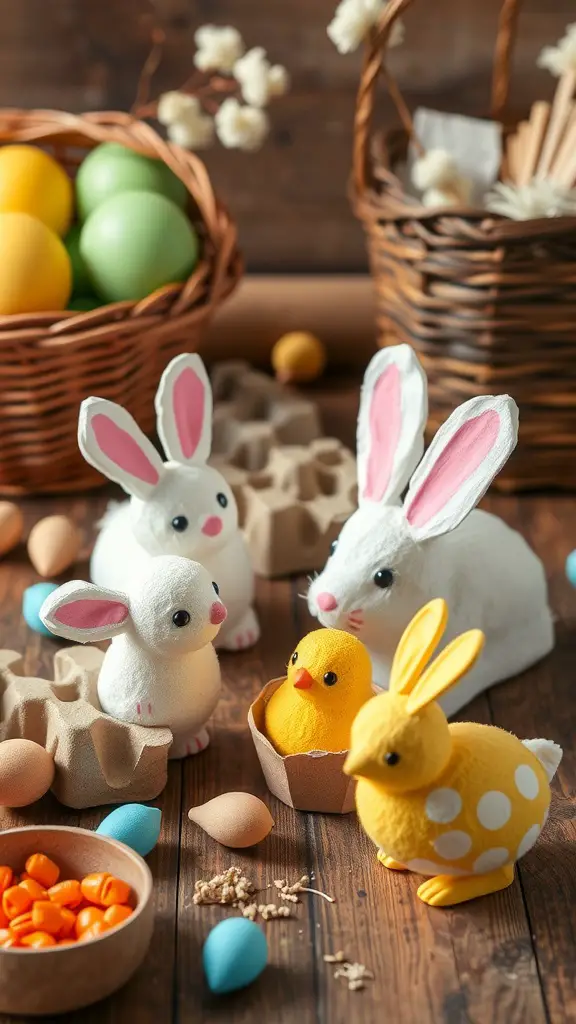
Creating egg carton chicks and bunnies is a delightful way to celebrate Easter. This project is simple and fun, making it perfect for kids and parents to do together. The image shows colorful bunnies and chicks made from egg cartons, surrounded by vibrant decorations. You can see cheerful yellow and white bunnies, along with cute chicks, all ready for Easter fun.
To start, gather your supplies. You’ll need an empty egg carton, paint, scissors, and some crafting materials like googly eyes and cotton balls. Cut the egg carton into sections to form the bodies. Then, let the kids paint them in bright colors. This is where the fun begins!
Once the paint dries, add details like eyes and ears using your crafting materials. Don’t forget to give your bunnies and chicks some personality! This hands-on activity not only brings creativity into your home but also makes for lovely Easter decorations.
Egg Carton Chicks and Bunnies
Materials Needed
- Empty egg cartons (cardboard or foam).
- Acrylic paint (yellow for chicks, white or pastel for bunnies).
- Paintbrushes.
- Construction paper (pink and orange).
- Glue or hot glue gun (adult supervision required).
- Scissors.
- Googly eyes.
- Small pom-poms or cotton balls (for bunny tails).
Instructions
- Cut individual cups from the egg carton to serve as the base.
- Paint the cups yellow for chicks or white for bunnies. Let dry.
- For chicks: Add googly eyes, a small orange paper beak, and tiny paper wings.
- For bunnies: Add googly eyes, pink paper ears, and a pom-pom tail.
- Let everything dry and display!
Nature-Inspired Easter Wreaths
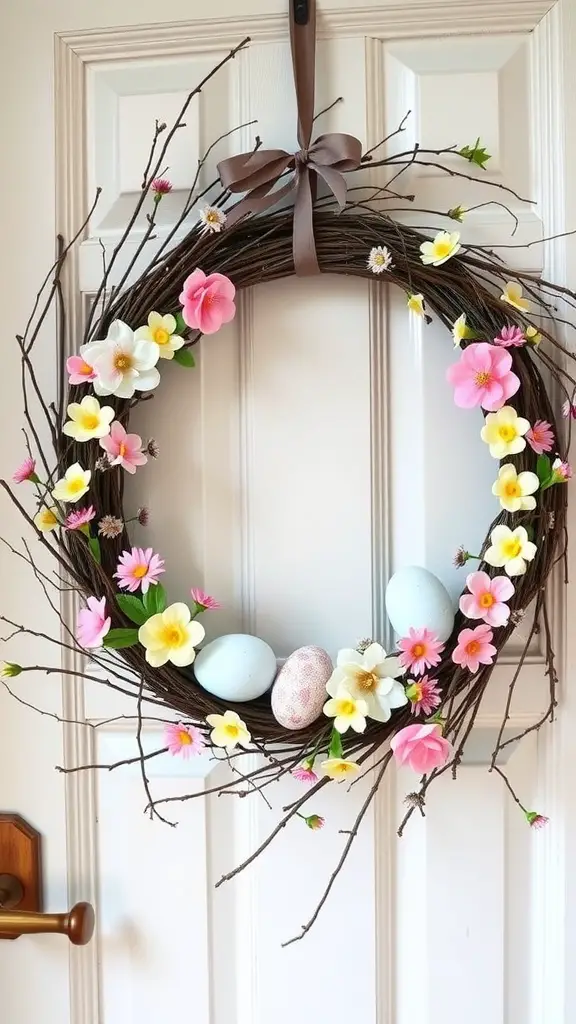
Creating nature-inspired Easter wreaths is a fun and engaging activity for kids and parents. Imagine gathering twigs, flowers, and colorful eggs to design a beautiful wreath that reflects the joy of the season. The wreath in the image is a perfect example of how to mix natural elements with festive decor.
The wreath features soft pink and yellow flowers alongside delicate eggs nestled within the branches. This combination brings a fresh and vibrant touch to any home during the Easter season. It’s not just about decoration; it’s a wonderful way to appreciate nature and celebrate creativity.
Gathering materials can be an exciting part of the process. Take a stroll outside to collect twigs or even some wildflowers. You can also use faux flowers for a longer-lasting wreath. This craft is one of the best Easter crafts for kids, inviting them to express themselves while enjoying quality time with their parents.
To make your own wreath, start with a base of twigs shaped into a circle. Then, glue or tie on the flowers and eggs as you like. Hang it on your door or wall to bring a touch of spring indoors. It’s not just a wreath; it’s a fun family project that creates lasting memories!
Materials Needed
- A foam or grapevine wreath base.
- Moss (real or faux).
- Twigs, small branches, or flowers (real or faux).
- Mini decorative eggs or birds.
- Ribbon for hanging.
- Glue or floral wire.
Instructions
- Cover the wreath base with moss, securing it with glue or floral wire.
- Arrange twigs and flowers around the wreath in a natural pattern.
- Add mini eggs or birds as accents.
- Attach a ribbon loop at the top for hanging.
Paper Plate Easter Baskets
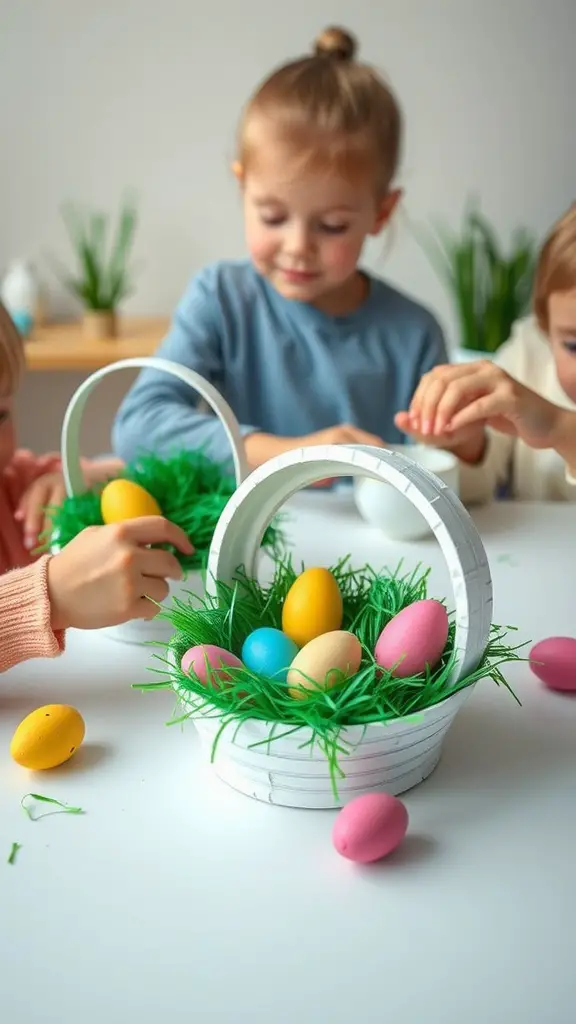
Creating paper plate Easter baskets is a fun and easy project for kids and parents. The image shows children engaged in this craft, with colorful eggs nestled in their handmade baskets. They look excited and focused, making this a great way to bond and enjoy the holiday spirit.
To make these adorable baskets, start with two paper plates. Cut one plate in half and use these halves as the sides of the basket. Color the plates with paint or markers to give them a festive look. Glue the halves to the bottom plate, creating a cute basket shape. Then, add some green shredded paper to mimic grass. Finally, paint or decorate plastic eggs and place them inside.
This activity not only sparks creativity but also helps kids develop fine motor skills. Plus, it’s a wonderful way to make memories together. Enjoy this simple Easter craft that the whole family can participate in!
Paper Plate Easter Baskets
Materials Needed
- Paper plates.
- Markers or paint.
- Scissors.
- Glue or stapler.
- Pipe cleaners or ribbon (for the handle).
Instructions
- Cut a paper plate in half.
- Decorate the outer surface with paint or markers.
- Attach the two halves together, forming a pouch.
- Staple or glue a pipe cleaner or ribbon handle to the top.
- Fill with candy or small Easter goodies.
Colorful Egg Dyeing Techniques
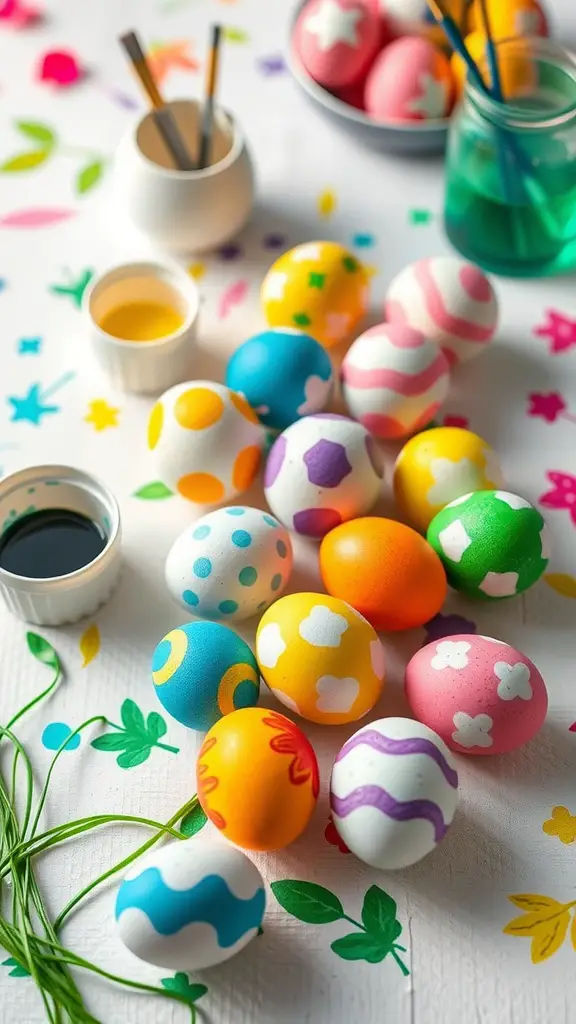
Dyeing eggs is a fun and creative way to celebrate Easter. In the image, you can see a collection of beautifully colored eggs, showcasing a variety of designs and patterns. This activity is a great option among Easter crafts for kids, allowing everyone to express their artistic side.
The setup features different colors of dye in small containers, along with brushes for painting. The vibrant colors and playful designs make the eggs look cheerful and festive. You can spot polka dots, stripes, and floral patterns, illustrating just how diverse and imaginative the results can be.
Gathering family or friends to dye eggs together is not just entertaining but also a wonderful bonding experience. Kids can learn about color mixing and patterns while having a blast. Plus, the end results can be proudly displayed as decoration throughout the holiday.
Simple Origami Easter Designs
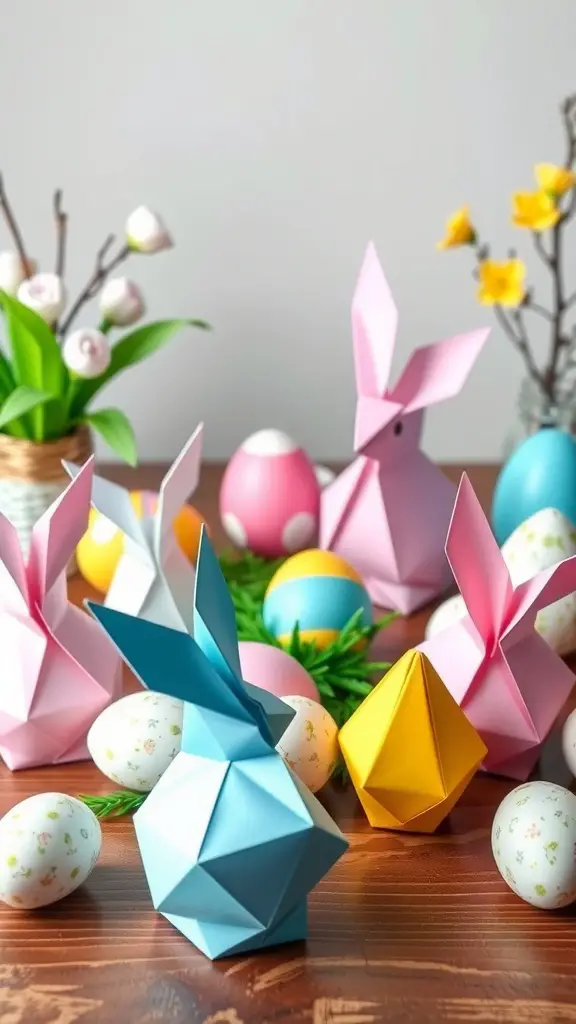
Origami is a fun and creative way to enjoy Easter crafts for kids. In this image, you can see delightful origami bunnies in various pastel colors, surrounded by decorative eggs. These paper creations are not only charming but also easy to make, making them perfect for a family activity.
The pastel colors of the bunnies and eggs add a cheerful touch to your Easter celebration. Each bunny has distinct shapes, showcasing the versatility of origami. This simplicity invites kids and parents to try folding paper together.
Engaging in origami teaches kids patience and precision, skills that are essential for crafting. Plus, it’s a great way to bond and share ideas. Once you’ve created your origami pieces, you can use them to decorate your home or as gifts for friends and family.
Simple Origami Easter Designs
Materials Needed
- Colored origami paper.
- Basic origami instructions (bunny, chick, egg, or flower).
Instructions
- Choose simple designs like a bunny or chick.
- Follow step-by-step folding instructions for each design.
- Use markers to add details like faces or decorations.
- Display your origami as part of your Easter decor or gifts.
Easter Story Stones for Imaginative Play
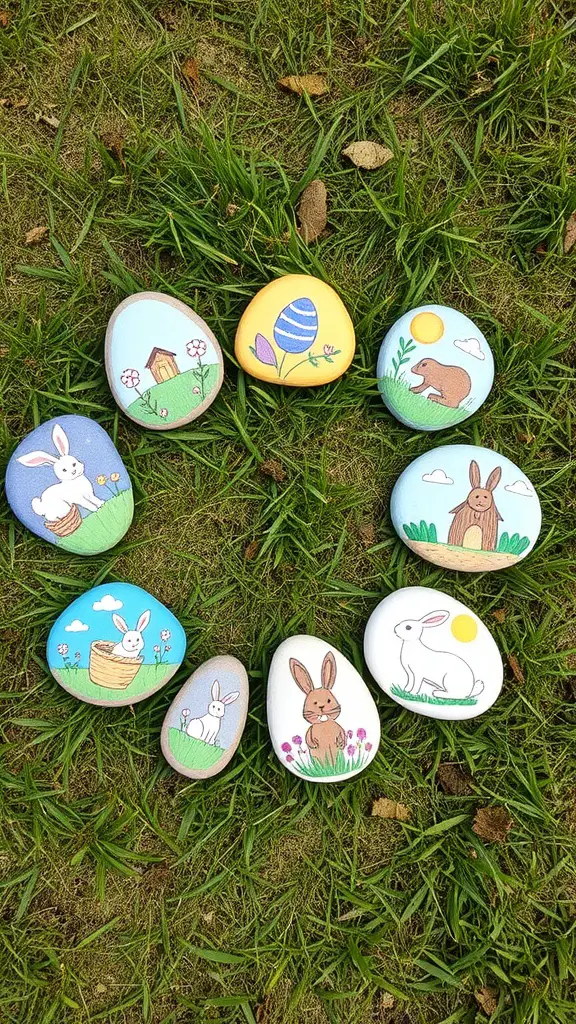
Creating Easter story stones is a fun and engaging way for kids and parents to celebrate the holiday together. The image shows a collection of beautifully painted stones, each featuring charming illustrations related to Easter. From bunnies to colorful eggs, these stones spark creativity and storytelling.
Parents can guide their children in painting their own stones, using simple materials like acrylic paints and rocks collected from the yard. Once the stones are decorated, they can be used to tell Easter stories or act out fun scenes. This activity not only promotes artistic expression but also encourages imaginative play.
These Easter crafts for kids are perfect for family bonding time. It’s a chance to share stories, create memories, and enjoy the beauty of spring. Each painted stone serves as a reminder of the fun times spent together, making this craft a keepsake for years to come.
Easter Story Stones for Imaginative Play
Materials Needed
- Smooth, flat stones (size that fits comfortably in hands).
- Acrylic paint or permanent markers.
- Paintbrushes.
- Clear acrylic sealer (optional for protection).
Instructions
- Prepare the Stones: Clean and dry your stones if they are dirty or rough. Smooth, flat stones work best for painting.
- Paint the Stones: Paint each stone with a unique Easter theme. You can create simple images such as:
- A bunny.
- An Easter egg.
- A flower or springtime plant.
- A chick hatching from an egg.
- A basket of eggs.
- A cross (if focusing on the religious aspect of Easter).
- Let Dry: Allow the paint to dry completely before handling or using the stones.
- Seal (Optional): Once the paint is dry, you can apply a clear acrylic sealer to protect your designs, especially if they’ll be used outdoors.
- Storytelling: Use the stones to create and tell Easter-themed stories. Place the stones in a bag or box and pick them out one by one, allowing each stone to inspire a part of the story. This encourages imaginative play as children create their own stories using the painted stones.
Tips:
- Keep the designs simple, as younger children will enjoy pointing out the images and incorporating them into their play.
- Consider adding a twist by making story prompts (like “What happens when the bunny meets the chick?” or “What does the Easter egg hold inside?”).
- You can even make a fun Easter-themed storybook by taking photos of the story stones in action and printing them into a small book.
These story stones will provide hours of fun and spark creativity for children of all ages!
Recycled Material Egg Maracas
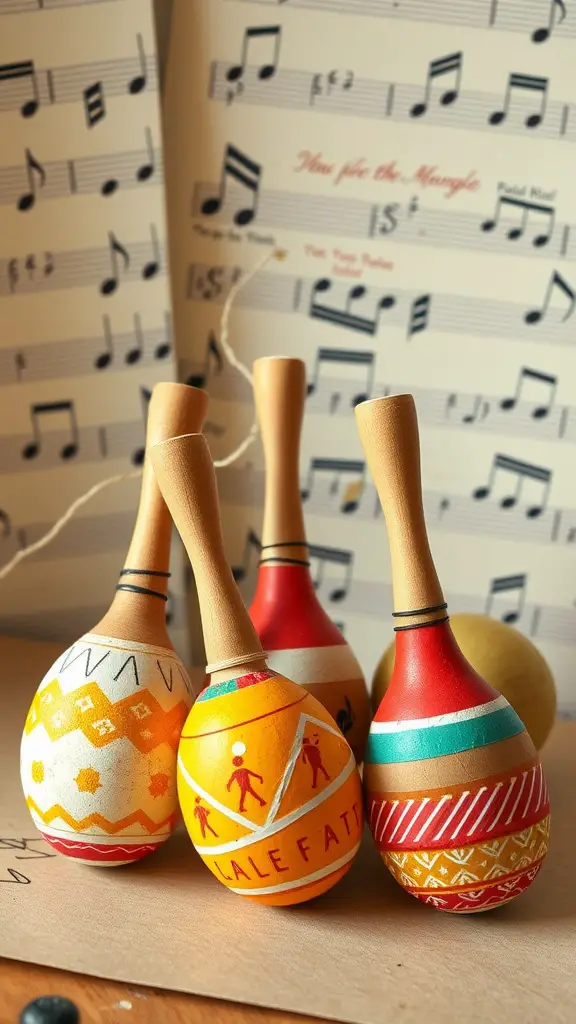
Recycled Material Egg Maracas are a fun and creative way to celebrate Easter with kids. This activity uses simple materials you can find around your home, making it an eco-friendly choice for Easter crafts for kids.
The image shows colorful maracas shaped like eggs, each painted with cheerful patterns. These maracas not only look great but also make delightful sounds when shaken. Kids will love decorating their maracas, choosing their favorite colors, and adding their unique touch.
To create your own egg maracas, gather some empty plastic eggs, rice or beans for filling, and paints or markers for decoration. Start by filling each plastic egg with a small amount of rice or beans. Then, tape or glue the halves together securely. Let the kids paint and customize their maracas. Once dry, they can shake them to the rhythm of their favorite tunes!
Recycled Material Egg Maracas
Materials Needed
- Plastic Easter eggs (the kind that open and close).
- Small rice, beans, or pasta (to act as the maraca filling).
- Clear tape or glue.
- Paint or markers (optional for decorating).
- Recycled materials such as paper towel tubes, toilet paper rolls, or cardboard.
Instructions
- Prepare the Egg: Open the plastic Easter egg and fill one half with rice, beans, or small pasta to create the maraca’s rattle sound.
- Seal the Egg: Close the egg tightly. Use tape or glue to seal the edges of the egg to ensure the contents stay inside. You can even reinforce the seal with a second layer of tape if needed.
- Decorate the Egg: Use paint, markers, or stickers to decorate the outside of the plastic egg. You can make it festive with spring or Easter designs, or simply let your kids get creative with colors and patterns.
- Create the Handle: If you’re using a paper towel tube or toilet paper roll as a handle, cut it to the desired length (about 4-6 inches). Attach one end of the tube to the sealed egg by gluing or taping it securely. For a more eco-friendly approach, you can use cardboard from recycled boxes.
- Finishing Touches: Decorate the handle with paint or markers if you’d like, or leave it simple for a rustic look.
- Shake and Play: Once everything is dry and secure, your recycled material egg maracas are ready to shake! You can use them in a mini Easter parade or as musical instruments for an Easter celebration.
Tips:
- Experiment with different materials for the filling (e.g., small pebbles, popcorn kernels, or even beads) to change the sound.
- If you don’t have a tube for the handle, you can also use sturdy craft sticks or simply hold the egg in hand.
- These maracas are a fun way to teach kids about recycling while adding an extra musical activity to your Easter celebrations.
These egg maracas are a fun, simple, and eco-friendly craft to keep the kids entertained and engaged during Easter!
Family Easter Scrapbook Project
The Family Easter Scrapbook Project is a wonderful way to celebrate the holiday with creativity. In this image, we see a family gathered together, each member engaged in the fun of crafting and decorating. They sit on a cozy blanket, surrounded by colorful Easter eggs and decorative elements. The warm setting invites everyone to participate, creating a relaxed atmosphere for bonding.
This project not only allows kids to express their artistic side but also encourages parents to join in on the fun. By collecting photos, drawings, and colorful decorations, you can create a scrapbook that captures the essence of your family’s Easter traditions. It’s a chance to relive those special moments year after year.
Gather supplies like scissors, glue, and markers. Use the colorful eggs shown in the image as inspiration for your pages. Each family member can contribute their ideas, making the scrapbook a collective masterpiece. It’s a perfect way to make lasting memories while enjoying some of the best Easter crafts for kids.
Family Easter Scrapbook Project
Materials Needed
- Blank scrapbook or a DIY scrapbook binder.
- Printed photos from previous Easters or springtime memories.
- Stickers, embellishments (like flowers, bunnies, or Easter eggs).
- Colored paper, cardstock, or patterned paper.
- Markers, pens, or colored pencils for writing.
- Glue, double-sided tape, or photo corners.
- Easter-themed stamps (optional).
- Scissors.
Instructions
- Choose Your Photos: Select a variety of photos from past Easters, such as egg hunts, family gatherings, or Easter crafts. These can be from this year or previous years. Make sure to print them in various sizes to add dimension to your pages.
- Prepare Your Scrapbook Pages: Open your scrapbook or create a DIY scrapbook by punching holes in your cardstock and adding it to a binder. You can also use pre-designed scrapbook pages for a more polished look.
- Design Your Pages: Begin by selecting a background paper for each page. Use bright, spring-themed papers like pastel colors, floral designs, or patterns that remind you of Easter (like polka dots or stripes). Cut the paper to fit the page and glue it down.
- Arrange Your Photos: Lay out your photos on the page before gluing them down. Create an attractive layout by overlapping pictures, turning some on their side, or arranging them in a collage format.
- Add Journaling: Write captions or little anecdotes next to the photos. This can be memories, funny moments, or things you’re grateful for. Use different colored pens or markers to make the journaling stand out.
- Decorate with Easter-Themed Embellishments: Add stickers, stamps, and embellishments around your photos and journaling to create a fun and festive look. Think about adding bunny stickers, Easter egg cutouts, or flower appliques.
- Personalize It: Involve your family by letting the kids draw pictures, add their handprints, or even write their own little notes or Easter wishes. This will make the scrapbook more personal and memorable.
- Final Touches: Once you’ve completed your pages, let them dry if you used any glue. Once dry, you can add any additional details or borders to make your scrapbook stand out.
- Enjoy and Share: Once your scrapbook is complete, gather the family to flip through the pages and share the memories. You can also add new pages every year to create a tradition of documenting your Easter celebrations.
Tips:
- If you don’t have a scrapbook, you can easily create one using a three-ring binder and clear sheet protectors for the photos.
- Use some recycled materials from past crafts to add texture or personal touches to the scrapbook.
- Consider adding little Easter quotes or Bible verses for a more spiritual touch to your project.
This Family Easter Scrapbook Project will not only help preserve memories but also serve as a fun, creative way to celebrate the season together. It’s a keepsake you’ll cherish for years to come!
Creating a Family Easter Scrapbook is not only a wonderful way to relive the memories of your special day, but it also allows you to be creative and bond with your family. Whether you’re a seasoned scrapbooker or just getting started, this project will bring joy and add a personal touch to your Easter celebrations. Don’t forget to check out the link above for more craft ideas that are perfect for making this Easter even more memorable!