

20 Adorable Easter Cookie Decorating Ideas For Beginners
As a mom who loves creating magical holiday memories, I’ve discovered that Easter brings endless opportunities for family fun! After spending wonderful afternoons doing Easter crafts with my little ones (check out our favorite 15 Fun Easter Crafts for Kids and Parents to Create Together) and planning exciting egg hunts (you’ll love these 20 Creative Easter Egg Hunt Ideas That Will Excite Your Kids), I’m thrilled to share our family’s favorite Easter cookie decorating ideas. These beginner-friendly designs are perfect for bringing even more joy to your Easter celebrations!
Looking for fun printables for the little ones to do this season? Get our Huge Easter Bundle printables, it will keep them busy for hours.


Bunny Ears Sugar Cookies
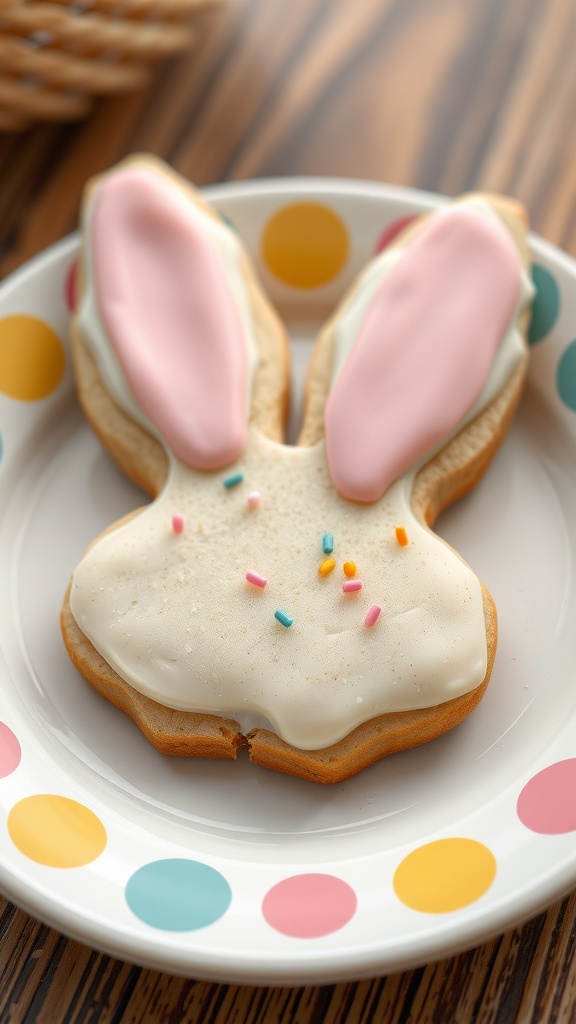
Bunny Ears Sugar Cookies are a delightful treat that perfectly capture the spirit of Easter. These cookies are soft, sweet, and adorned with colorful icing that mimics adorable bunny ears, making them a fun project for both kids and adults. The taste is a classic sugar cookie flavor, buttery and sweet, sure to please anyone with a sweet tooth.
This recipe is simple to make and allows for plenty of creativity in decorating. You can easily customize the colors and sprinkles to match your Easter celebration. Plus, they make a charming addition to any Easter basket!
Ingredients
- 2 3/4 cups all-purpose flour
- 1 teaspoon baking soda
- 1 teaspoon baking powder
- 1 cup unsalted butter, softened
- 1 1/2 cups white sugar
- 1 egg
- 1 teaspoon vanilla extract
- 1/2 teaspoon almond extract
- 3 cups powdered sugar
- 2 tablespoons milk
- Pink food coloring
- Assorted sprinkles
Instructions
- Preheat the oven to 375°F (190°C). In a small bowl, stir together flour, baking soda, and baking powder. Set aside.
- In a large bowl, cream together the butter and sugar until smooth. Beat in the egg, vanilla extract, and almond extract.
- Gradually blend in the dry ingredients. Once mixed, form the dough into bunny shapes using a cookie cutter, ensuring to make the ears distinct.
- Place the cookies on ungreased baking sheets and bake for 8 to 10 minutes, or until golden. Let cool on wire racks.
- For the icing, mix powdered sugar and milk until smooth. Divide into two bowls; tint one with pink food coloring. Decorate the cookies with the icing and add sprinkles for extra flair.
Bunny Face Cookies with Whipped Cream

Bunny face cookies are a delightful and playful treat perfect for Easter celebrations. These cookies combine a soft, buttery base with a creamy frosting that resembles a cute bunny face. They are not only fun to make but also simple enough for beginners, making them a great choice for family baking sessions.
The taste is wonderfully sweet with a hint of vanilla, and the decorated frosting adds a charming touch that will surely bring smiles all around. Whether you’re hosting a gathering or just want to bring some festive cheer to your home, these bunny cookies are sure to be a hit!
Ingredients
- 2 cups all-purpose flour
- 1/2 teaspoon baking powder
- 1/4 teaspoon salt
- 1/2 cup unsalted butter, softened
- 1 cup granulated sugar
- 1 large egg
- 1 teaspoon vanilla extract
- 1 cup whipped cream (for decoration)
- Pink and white icing (for bunny ears)
- Chocolate chips (for eyes and nose)
Instructions
- Preheat your oven to 350°F (175°C) and line a baking sheet with parchment paper.
- In a bowl, mix the flour, baking powder, and salt. In another bowl, cream together the butter and sugar until light and fluffy. Add the egg and vanilla, mixing well.
- Gradually add the dry ingredients to the wet ingredients, stirring until combined. Roll the dough into tablespoon-sized balls and place them on the baking sheet, flattening slightly.
- Bake for 10-12 minutes until the edges are golden. Let them cool completely on a wire rack.
- Once cooled, use whipped cream to cover the tops of the cookies. Pipe pink and white icing for the bunny ears and place chocolate chips for the eyes and nose. Serve and enjoy!
Carrot Cookies with Orange Icing

These adorable carrot cookies are perfect for Easter celebrations. With their sweet and buttery flavor, they bring a cheerful and festive touch to any gathering. The bright orange icing paired with vibrant green tops makes them not just tasty but also visually delightful, making them a hit with both kids and adults.
This recipe is simple to follow, making it a great choice for beginners. You’ll enjoy decorating these cookies as much as you will eating them!
Ingredients
- 2 cups all-purpose flour
- 1/2 teaspoon baking powder
- 1/4 teaspoon salt
- 1/2 cup unsalted butter, softened
- 1 cup granulated sugar
- 1 large egg
- 1 teaspoon vanilla extract
- 1/2 teaspoon orange zest
- 1 cup powdered sugar
- 2 tablespoons orange juice
- Green icing for decoration
Instructions
- Preheat the oven to 350°F (175°C). In a bowl, mix the flour, baking powder, and salt. Set aside.
- In another bowl, cream the softened butter and granulated sugar until light and fluffy. Add the egg, vanilla extract, and orange zest, mixing until well combined.
- Gradually add the dry ingredients to the butter mixture, mixing until a dough forms. Chill the dough for 30 minutes.
- Roll out the chilled dough and cut it into carrot shapes using a cookie cutter. Place the cookies on a baking sheet lined with parchment paper.
- Bake for 8-10 minutes until the edges are lightly golden. Let them cool completely.
- For the icing, whisk the powdered sugar and orange juice until smooth. Once the cookies are cool, dip the tops into the orange icing. Allow the icing to set, then pipe green icing on top to create the carrot tops.
Egg-shaped Cookies with Pastel Colors

Egg-shaped cookies are a delightful treat for Easter celebrations. Their soft, buttery flavor combined with a touch of sweetness makes them irresistible. Perfect for beginners, these cookies are easy to whip up and can be decorated in a variety of pastel colors to match the festive spirit.
Using simple ingredients, you can create a batch of these charming cookies that are sure to impress family and friends. Whether you’re decorating with fondant, icing, or sprinkles, the possibilities are endless. Here’s a fun recipe to make these charming Easter egg cookies!
Ingredients
- 2 3/4 cups all-purpose flour
- 1 teaspoon baking powder
- 1/2 teaspoon salt
- 1 cup unsalted butter, softened
- 1 1/2 cups granulated sugar
- 1 large egg
- 1 teaspoon vanilla extract
- Food coloring (pastel colors)
- Royal icing (for decoration)
Instructions
- Prepare the Dough: In a bowl, mix flour, baking powder, and salt. In another bowl, cream together softened butter and sugar until light and fluffy. Beat in the egg and vanilla. Gradually add the flour mixture until combined.
- Chill the Dough: Wrap the dough in plastic wrap and refrigerate for at least 1 hour to help it firm up.
- Shape the Cookies: Preheat your oven to 350°F (175°C). Roll out the chilled dough on a floured surface to about 1/4 inch thick. Use an egg-shaped cookie cutter to cut out cookies and place them on a baking sheet lined with parchment paper.
- Bake the Cookies: Bake for 10-12 minutes, or until the edges are lightly golden. Cool completely on a wire rack.
- Decorate: Once cooled, use royal icing mixed with food coloring to decorate the cookies in fun pastel shades. Let the icing dry before serving.
Flower Petal Cookies with Edible Glitter

Flower petal cookies are a delightful treat that captures the essence of spring. These charming cookies are not only visually appealing but also deliciously sweet, making them a perfect addition to any Easter celebration. With their soft texture and colorful icing, they’re light and fun, appealing to both kids and adults alike. Plus, they are easy enough for beginners to tackle, allowing everyone to get creative in the kitchen!
The edible glitter adds a magical touch, making these cookies sparkle like a garden in full bloom. As you step into the world of Easter cookie recipes, these flower petal cookies will surely stand out. Let’s get into the ingredients and instructions to create these delightful cookies!
Ingredients
- 2 1/2 cups all-purpose flour
- 1 cup unsalted butter, softened
- 1 cup granulated sugar
- 1 large egg
- 1 teaspoon vanilla extract
- 1/2 teaspoon baking powder
- 1/4 teaspoon salt
- Decorating icing in various colors
- Edible glitter
Instructions
- Make the Dough: In a bowl, cream together the softened butter and sugar until light and fluffy. Add the egg and vanilla extract, mixing well. In another bowl, whisk flour, baking powder, and salt together. Gradually combine the wet and dry mixtures until a dough forms.
- Chill the Dough: Wrap the dough in plastic wrap and refrigerate for at least 1 hour to make it easier to roll out.
- Roll and Cut: Preheat your oven to 350°F (175°C). Roll out the chilled dough on a floured surface to about 1/4 inch thick. Use a flower-shaped cookie cutter to cut out shapes and place them on a baking sheet lined with parchment paper.
- Bake: Bake cookies for about 8-10 minutes or until the edges are slightly golden. Allow them to cool completely on a wire rack.
- Decorate: Once cooled, decorate the cookies with colorful icing and sprinkle edible glitter on top for that special sparkle.
Chick Cookies with Candy Eyes

Chick cookies are a delightful addition to any Easter celebration. These cheerful little treats are not only adorable but also incredibly tasty, thanks to their buttery cookie base and sweet icing. The soft yellow icing gives them a bright, festive look, perfect for springtime gatherings. Plus, they’re simple enough for beginners to master, making them a great choice for family baking sessions.
Decorating these cookies can be a fun project! With just a few ingredients and some candy eyes, you can create a tray of cute chick cookies that everyone will love. These cookies are perfect for sharing or just enjoying at home during the holiday season.
Ingredients
- 2 3/4 cups all-purpose flour
- 1 teaspoon baking powder
- 1/2 teaspoon salt
- 1 cup unsalted butter, softened
- 1 cup granulated sugar
- 1 large egg
- 1 teaspoon vanilla extract
- Yellow royal icing (for decorating)
- Orange candy (for beaks)
- Candy eyes
Instructions
- Preheat your oven to 350°F (175°C). Line a baking sheet with parchment paper.
- In a bowl, mix the flour, baking powder, and salt together. Set aside.
- In another large bowl, cream together the softened butter and granulated sugar until smooth. Beat in the egg and vanilla extract.
- Gradually add the dry ingredients to the wet mixture, mixing until a dough forms.
- Roll out the dough on a floured surface to about 1/4 inch thick. Use a chick-shaped cookie cutter to cut out cookies and place them on the prepared baking sheet.
- Bake for 8-10 minutes, or until the edges are lightly golden. Let them cool completely on a wire rack.
- Once cooled, decorate each cookie with yellow royal icing. Attach the orange candy for the beak and add the candy eyes.
- Let the icing set before serving or storing. Enjoy your adorable chick cookies!
Peep-inspired Marshmallow Cookies

Peep-inspired marshmallow cookies are a delightful treat that perfectly captures the whimsical spirit of Easter. These cookies are not only visually appealing but also offer a sweet and chewy texture that makes them irresistible. With their soft marshmallow toppings and colorful designs, they are a fun project for beginners and a hit at any Easter gathering.
Making these cookies is simple and enjoyable, perfect for those looking for easy Easter cookie recipes. You’ll love how quick they come together, and decorating them can be a great activity for kids and adults alike. Gather your ingredients, and let’s get started on these adorable treats!
Ingredients
- 1 cup unsalted butter, softened
- 1 cup granulated sugar
- 2 large eggs
- 2 teaspoons vanilla extract
- 2 3/4 cups all-purpose flour
- 1 teaspoon baking powder
- 1/2 teaspoon salt
- 1 cup colorful marshmallow Peeps
- 1 cup icing (yellow and blue for decoration)
Instructions
- Preheat your oven to 350°F (175°C). Line a baking sheet with parchment paper.
- In a large bowl, cream together the softened butter and sugar until light and fluffy. Add in the eggs and vanilla extract, mixing until well combined.
- In another bowl, whisk together the flour, baking powder, and salt. Gradually add the dry ingredients to the butter mixture, mixing until just combined.
- Roll the dough into small balls and place them on the prepared baking sheet. Flatten each ball slightly.
- Bake the cookies for 10-12 minutes or until the edges are golden. Let them cool on the baking sheet for a few minutes before transferring them to a wire rack to cool completely.
- Once cooled, decorate each cookie with icing, and top them with a marshmallow Peep in the center.
Cross Cookies with Religious Symbolism

These delightful cross cookies combine spirituality and sweetness, making them a perfect treat for Easter celebrations. With a crisp exterior and a soft, buttery center, they are not just visually appealing but also deliciously simple to make. Perfect for beginners, these cookies can be decorated with various icings and toppings, allowing for creativity while keeping it accessible.
The recipe captures the essence of Easter with its religious symbolism while inviting everyone to join in the fun of baking. Whether shared at a church gathering or enjoyed at home, these cookies are a meaningful way to celebrate the season.
Ingredients
- 2 3/4 cups all-purpose flour
- 1 teaspoon baking powder
- 1/2 teaspoon salt
- 1 cup unsalted butter, softened
- 1 1/2 cups granulated sugar
- 1 large egg
- 2 teaspoons vanilla extract
- Royal icing (for decoration)
- Food coloring (optional)
Instructions
- Preheat the Oven: Preheat your oven to 350°F (175°C). Line baking sheets with parchment paper.
- Make the Dough: In a bowl, whisk together flour, baking powder, and salt. In another bowl, beat the softened butter and sugar until fluffy. Add in the egg and vanilla, mixing until combined. Gradually add the dry ingredients to the wet, mixing until just combined.
- Shape the Cookies: Roll out the dough on a floured surface to about 1/4-inch thickness. Use a cross-shaped cookie cutter to cut out the cookies. Place them on the prepared baking sheets.
- Bake: Bake for 8-10 minutes or until the edges are lightly golden. Let them cool on the baking sheets for a few minutes before transferring to wire racks to cool completely.
- Decorate: Once cooled, use royal icing to decorate the cookies. Feel free to use food coloring to create a variety of designs and patterns.
Rainbow Swirl Cookies
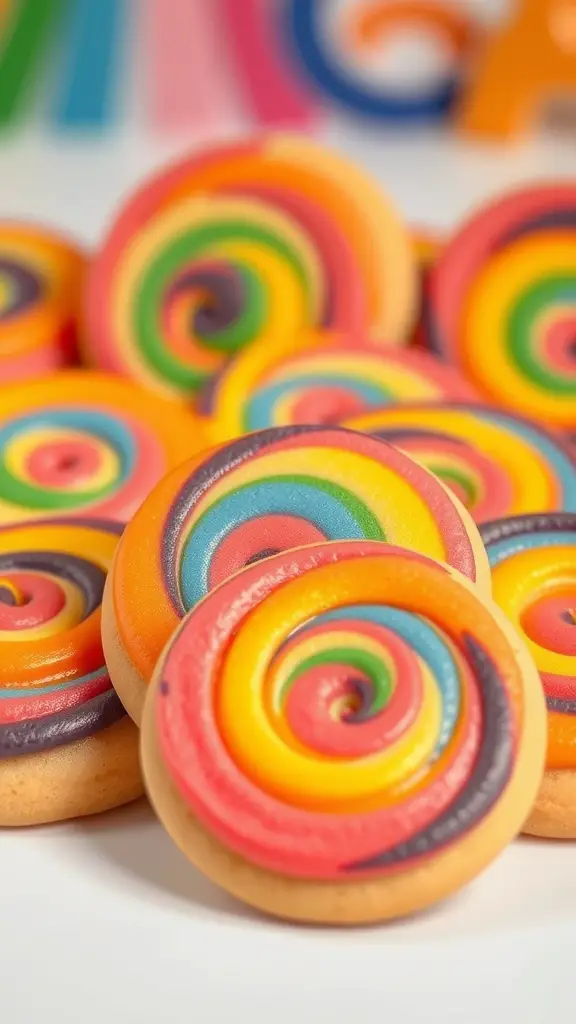
Rainbow swirl cookies are a delightful treat that bring a splash of color and fun to your Easter celebrations. These cookies are not only visually appealing but also have a soft, buttery texture that melts in your mouth. They’re easy to make, making them perfect for bakers of all skill levels.
The vibrant colors make these cookies a hit with everyone, especially kids! Combining simple ingredients with a bit of food coloring allows you to create beautiful swirls that are sure to impress. Try your hand at these rainbow swirl cookies for a creative twist on traditional Easter treats.
Ingredients
- 2 3/4 cups all-purpose flour
- 1 teaspoon baking powder
- 1/2 teaspoon salt
- 1 cup unsalted butter, softened
- 1 1/2 cups granulated sugar
- 1 large egg
- 1 teaspoon vanilla extract
- Food coloring (red, yellow, green, blue, and purple)
Instructions
- Preheat your oven to 350°F (175°C) and line a baking sheet with parchment paper.
- In a bowl, whisk together the flour, baking powder, and salt. Set it aside.
- In a large mixing bowl, cream the softened butter and sugar until light and fluffy. Add the egg and vanilla extract, mixing until combined.
- Gradually add the dry ingredients to the butter mixture, mixing until just combined.
- Divide the dough into five equal portions and color each portion with a different food coloring.
- Roll each colored dough into a log and layer them together, twisting to create a spiral effect.
- Slice the log into rounds and place them on the prepared baking sheet.
- Bake for 10-12 minutes or until the edges are lightly golden. Allow them to cool on a wire rack before serving.
Bunny Footprint Cookies

Bunny footprint cookies bring a delightful twist to your Easter celebrations. These cute cookies are not only fun to create but also taste deliciously sweet with a hint of vanilla. Perfect for beginners, they require simple ingredients and techniques.
The joy of decorating these cookies is unmatched, making them a hit with kids and adults alike. Using royal icing, you can easily shape and color the footprints, creating an adorable addition to your Easter cookie lineup. Try this easy recipe and enjoy making these festive treats!
Ingredients
- 2 3/4 cups all-purpose flour
- 1 teaspoon baking soda
- 1/2 teaspoon baking powder
- 1 cup unsalted butter, softened
- 1 1/2 cups white sugar
- 1 egg
- 1 teaspoon vanilla extract
- 1/2 teaspoon almond extract
- 3 cups royal icing (store-bought or homemade)
- Food coloring (pink and white)
Instructions
- Preheat the oven to 350°F (175°C) and line baking sheets with parchment paper.
- In a bowl, mix flour, baking soda, and baking powder. Set aside.
- In another bowl, cream together butter and sugar until smooth. Beat in the egg, vanilla, and almond extract.
- Gradually blend in the dry ingredients until well combined.
- Roll out the dough on a floured surface and use a bunny footprint cookie cutter to cut out shapes. Place them on the prepared baking sheets.
- Bake for 8-10 minutes or until lightly golden. Allow to cool on a wire rack.
- Once cooled, decorate with royal icing. Use pink food coloring for the toe pads to create an adorable bunny footprint look.
Easter Basket Cookies with Mini Eggs

Easter Basket Cookies are a fun and festive treat that captures the spirit of the holiday. These adorable cookies are not only delightful to look at but also deliciously sweet, making them a hit for gatherings. With a base of buttery cookie dough and vibrant mini eggs, they bring a cheerful touch to your Easter celebrations.
This recipe is perfect for beginners, as it requires simple ingredients and minimal techniques. Everyone will enjoy creating their own edible baskets filled with chocolate eggs!
Ingredients
- 2 3/4 cups all-purpose flour
- 1 teaspoon baking soda
- 1/2 teaspoon salt
- 1 cup unsalted butter, softened
- 1 cup granulated sugar
- 1 cup brown sugar, packed
- 2 large eggs
- 2 teaspoons vanilla extract
- 1 cup shredded coconut (optional, for “grass”)
- 1 cup mini chocolate eggs
Instructions
- Preheat the Oven: Begin by preheating your oven to 350°F (175°C) and lining your baking sheets with parchment paper.
- Mix Dry Ingredients: In a bowl, whisk together flour, baking soda, and salt.
- Cream Butter and Sugars: In a large mixing bowl, cream the softened butter, granulated sugar, and brown sugar until light and fluffy. Add eggs and vanilla, mixing until well combined.
- Combine: Gradually add the dry mixture to the wet mixture, stirring until just combined. Avoid overmixing.
- Shape Cookies: Scoop tablespoons of dough onto the lined baking sheets, spacing them about 2 inches apart. Use your fingers to shape them into a small basket shape.
- Bake: Bake for 10-12 minutes or until the edges are lightly golden. Let them cool on the baking sheets for a few minutes before transferring them to wire racks.
- Decorate: Once cooled, add shredded coconut on top for grass and place mini chocolate eggs in the center of each cookie to create the basket effect.
Ladybug Cookies with Black Spots

These ladybug cookies are a fun and cheerful addition to any Easter celebration. With their bright red color and playful black spots, they not only look adorable but also taste delightful. Made with a buttery cookie base, these treats are both sweet and satisfying, perfect for kids and adults alike. What’s great is that they’re easy to make, so even beginner bakers can whip them up with confidence!
Decorating these cookies is where the real fun begins! You can use royal icing to create the ladybug design, making it a great project for family bonding. Plus, they make wonderful gifts or party favors for your Easter gatherings. Let’s get started!
Ingredients
- 2 1/2 cups all-purpose flour
- 1 cup unsalted butter, softened
- 1 cup granulated sugar
- 1 egg
- 1 teaspoon vanilla extract
- 1/2 teaspoon baking powder
- 1/4 teaspoon salt
- Red and black icing (for decoration)
- Edible white beads (for eyes)
Instructions
- Preheat your oven to 350°F (175°C). Line a baking sheet with parchment paper.
- In a mixing bowl, cream together the softened butter and sugar until light and fluffy. Add the egg and vanilla extract, mixing until well combined.
- In another bowl, whisk together the flour, baking powder, and salt. Gradually add this dry mixture to the wet ingredients, stirring until a dough forms.
- Roll the dough into small balls and place them on the prepared baking sheet. Flatten each ball slightly with your hand.
- Bake for 10-12 minutes or until the edges are lightly golden. Allow to cool completely before decorating.
- Once cool, use red icing to cover half the cookie and black icing for the other half. Create two black spots and a line down the center for the ladybug’s wings. Add edible beads for the eyes.
- Let the icing dry completely before serving or packaging.
Gingham Pattern Cookies

Gingham pattern cookies are a delightful treat that adds a touch of charm to any Easter celebration. These cookies not only look adorable but also have a sweet, buttery flavor that everyone loves. Perfect for beginners, this recipe is easy to follow and requires minimal ingredients, making it a fun baking activity for the whole family.
The gingham design is simple yet eye-catching, making these cookies a fantastic addition to your Easter cookie collection. Using royal icing, you can create vibrant and playful patterns that are sure to impress your guests. Plus, they taste as good as they look!
Ingredients
- 2 ¾ cups all-purpose flour
- 1 teaspoon baking powder
- ¼ teaspoon salt
- 1 cup unsalted butter, softened
- 1 cup granulated sugar
- 1 large egg
- 1 teaspoon vanilla extract
- Food coloring (red and white for gingham)
- 2 cups powdered sugar
- 1-2 tablespoons milk (for icing)
Instructions
- Prepare the Dough: In a bowl, whisk together flour, baking powder, and salt. In a separate bowl, cream the butter and sugar until light and fluffy. Beat in the egg and vanilla, then gradually add the flour mixture until combined.
- Chill the Dough: Wrap the dough in plastic wrap and refrigerate for at least 1 hour to firm up.
- Cut and Bake: Preheat your oven to 350°F (175°C). Roll out the chilled dough on a lightly floured surface and cut out your desired shapes. Place on a baking sheet and bake for 8-10 minutes or until the edges are lightly golden.
- Make the Icing: In a bowl, mix the powdered sugar with milk until smooth. Divide the icing into two bowls and color one red. Use the white icing to cover the cooled cookies and let them dry.
- Create the Gingham Pattern: Once the white icing is set, use the red icing to pipe a grid pattern over the cookies, creating the gingham effect. Allow the icing to dry completely before serving.
Chocolate Dipped Egg Cookies

Chocolate dipped egg cookies are a delightful treat that combine soft, buttery cookies with a rich chocolate finish. These cookies are not only delicious but also fun to decorate, making them perfect for Easter celebrations. With a simple combination of ingredients, even beginner bakers can whip these up with ease.
The sweet, melt-in-your-mouth taste of the cookie pairs beautifully with the smooth chocolate coating. You can top them with colorful sprinkles for a festive touch, making them visually appealing as well as tasty. These cookies are a fantastic addition to your list of Easter cookies recipes, especially since they are easy to make and decorate.
Ingredients
- 1 cup unsalted butter, softened
- 1 cup granulated sugar
- 2 large eggs
- 2 teaspoons vanilla extract
- 2 1/2 cups all-purpose flour
- 1 teaspoon baking powder
- 1/2 teaspoon salt
- 1 1/2 cups semi-sweet chocolate chips
- 1/4 cup colorful sprinkles (optional)
Instructions
- Cream the Butter and Sugar: In a mixing bowl, beat together the softened butter and granulated sugar until light and fluffy. This should take about 3-4 minutes.
- Add Eggs and Vanilla: Mix in the eggs one at a time, followed by the vanilla extract, until well combined.
- Combine Dry Ingredients: In a separate bowl, whisk together the flour, baking powder, and salt. Gradually add this mixture to the wet ingredients until just combined.
- Chill the Dough: Cover the dough and refrigerate for about 30 minutes to make it easier to handle.
- Shape and Bake: Preheat your oven to 350°F (175°C). Roll the chilled dough into egg shapes and place them on a baking sheet lined with parchment paper. Bake for 10-12 minutes or until the edges are lightly golden.
- Cool and Dip: Allow the cookies to cool completely before dipping half of each cookie into melted chocolate. Let the excess chocolate drip off and place them on wax paper. Sprinkle with colorful sprinkles if desired.
- Set the Chocolate: Allow the chocolate to set at room temperature or refrigerate until firm. Once set, these cookies are ready to be enjoyed!
Pastel Ombre Cookies

These pastel ombre cookies are a delightful treat that perfectly capture the spirit of Easter. With their soft, buttery texture and subtly sweet flavor, they make a charming addition to any springtime gathering. The eye-catching ombre effect adds a fun twist that is surprisingly easy to achieve, making them perfect for beginner bakers.
Creating these cookies is simple and requires just a few basic ingredients. The key is to use gel food coloring to achieve the lovely gradient, giving each cookie a unique look. They taste as lovely as they look, ensuring your Easter celebration is both beautiful and delicious!
Ingredients
- 2 3/4 cups all-purpose flour
- 1 teaspoon baking soda
- 1/2 teaspoon salt
- 1 cup unsalted butter, softened
- 1 1/4 cups granulated sugar
- 1 large egg
- 1 teaspoon vanilla extract
- Gel food coloring (pastel colors: pink, blue, yellow)
- 1 cup powdered sugar (for dusting)
Instructions
- Preheat your oven to 350°F (175°C). Line a baking sheet with parchment paper.
- In a bowl, whisk together flour, baking soda, and salt. Set aside.
- In another large bowl, beat the softened butter and granulated sugar until creamy. Add the egg and vanilla extract, mixing until well combined.
- Gradually add the dry ingredients to the wet mixture, stirring until a dough forms.
- Divide the dough into three equal portions. In each portion, add a few drops of different gel food coloring, mixing until you achieve the desired pastel shades.
- Shape the dough portions into balls and then flatten them slightly. Layer the colors by stacking them in order of darkness to lightness. Gently press together to form a cookie shape.
- Place the cookies on the prepared baking sheet and bake for 10-12 minutes, until the edges are lightly golden.
- Allow cookies to cool before dusting with powdered sugar.
Mini Flower Cookies on a Garden Background

These mini flower cookies are perfect for Easter celebrations and will surely brighten up any gathering. With their delicate taste and charming appearance, they are a delightful treat that even beginners can master. The cookies have a buttery, melt-in-your-mouth texture, complemented by a touch of sweetness, making them irresistible.
Decorating these cookies is a fun and simple process, allowing you to unleash your creativity. Use vibrant icing and colorful sprinkles to bring your garden to life on each cookie. Not only are these Easter cookies recipes easy to follow, but they also provide a great way to bond with family and friends in the kitchen.
Ingredients
- 2 3/4 cups all-purpose flour
- 1/2 teaspoon baking powder
- 1/4 teaspoon salt
- 1 cup unsalted butter, softened
- 1 cup granulated sugar
- 1 large egg
- 1 teaspoon vanilla extract
- 1/2 teaspoon almond extract
- Decorating icing (various colors)
- Sprinkles (optional)
Instructions
- Prepare the Dough: In a bowl, whisk together flour, baking powder, and salt. In another large bowl, cream the butter and sugar until light and fluffy. Add the egg, vanilla, and almond extracts, mixing well. Gradually add the flour mixture until a dough forms.
- Chill the Dough: Divide the dough in half, wrap in plastic wrap, and chill in the refrigerator for at least 1 hour.
- Shape and Bake: Preheat the oven to 350°F (175°C). Roll out the dough to about 1/4-inch thickness on a floured surface. Cut out flower shapes using cookie cutters and place them on a baking sheet lined with parchment paper. Bake for 8-10 minutes until lightly golden.
- Decorate: Let the cookies cool completely. Use your decorating icing to create colorful flower designs on each cookie. Add sprinkles for extra flair if desired.
Butterfly Cookies with Colorful Wings

Butterfly cookies are a delightful treat that brings a touch of spring to your Easter celebrations. These cookies are not only visually stunning but also incredibly tasty, with a buttery flavor that melts in your mouth. The vibrant colors used for decorating make them perfect for kids and adults alike, and they are surprisingly easy to make, even for beginners.
This fun recipe allows you to get creative with colors and designs, making each cookie unique. As you decorate, you can enjoy the process of bringing these beautiful butterflies to life. They are a fantastic way to celebrate the season and make for a lovely addition to any Easter cookie platter.
Ingredients
- 2 ¾ cups all-purpose flour
- 1 teaspoon baking powder
- ½ teaspoon salt
- 1 cup unsalted butter, softened
- 1 cup granulated sugar
- 1 egg
- 1 teaspoon vanilla extract
- Food coloring (various colors)
- Royal icing (for decorating)
Instructions
- Prepare the Dough: In a bowl, whisk together flour, baking powder, and salt. In another bowl, cream the softened butter and sugar until light and fluffy. Add the egg and vanilla, mixing well. Gradually add the dry ingredients to the wet mixture, stirring until combined.
- Chill the Dough: Wrap the dough in plastic wrap and refrigerate for at least 1 hour to make it easier to roll out.
- Cut the Cookies: Preheat the oven to 350°F (175°C). Roll out the chilled dough on a floured surface to about ¼ inch thick. Use a butterfly-shaped cookie cutter to cut out cookies and place them on a baking sheet lined with parchment paper.
- Bake: Bake for 8-10 minutes or until the edges are lightly golden. Allow the cookies to cool completely before decorating.
- Decorate: Use royal icing and food coloring to create colorful butterfly wings. Get creative with designs and let your cookies dry completely before serving.
Honeycomb Pattern Cookies

Honeycomb pattern cookies are not just visually appealing; they offer a delightful blend of sweetness and a hint of crunch. These cookies are perfect for Easter celebrations, allowing you to showcase your decorating skills in a fun and accessible way. The combination of soft, buttery dough with a sweet glaze gives them a satisfying taste that is sure to please everyone.
Making these cookies is quite simple, even for beginners. With just a few ingredients and some creativity, you can create a batch of decorated cookies that will impress your friends and family. Let’s jump into the recipe!
Ingredients
- 2 ½ cups all-purpose flour
- 1 cup unsalted butter, softened
- 1 cup granulated sugar
- 1 egg
- 1 teaspoon vanilla extract
- ½ teaspoon baking powder
- ¼ teaspoon salt
- Royal icing for decorating (store-bought or homemade)
- Yellow food coloring
- Honey flavoring (optional)
Instructions
- Preheat the oven to 350°F (175°C). In a bowl, cream together the softened butter and sugar until light and fluffy. Beat in the egg and vanilla extract.
- In a separate bowl, whisk together flour, baking powder, and salt. Gradually add the dry ingredients to the wet mixture, mixing until a dough forms.
- Roll out the dough on a floured surface to about ¼ inch thick. Use a honeycomb-shaped cookie cutter to cut out the cookies and place them on a baking sheet lined with parchment paper.
- Bake for 10-12 minutes or until the edges are lightly golden. Let them cool completely on a wire rack.
- For decorating, mix royal icing with a few drops of yellow food coloring and any honey flavoring if desired. Once the cookies are cool, pipe the icing onto the cookies to create the honeycomb pattern.
Easter Egg Hunt Cookies with Hidden Surprises

Easter Egg Hunt Cookies are a delightful treat that combines the joy of cookie decorating with the excitement of discovering hidden surprises inside. These cookies are not only visually appealing with their colorful icing and shapes, but they also offer a fun surprise when bitten into. The taste is a sweet balance of buttery cookie and sugary icing, making them a hit with kids and adults alike. Plus, they’re simple to make, perfect for beginners looking to try their hand at Easter cookies recipes.
These cookies can be made using your favorite sugar cookie recipe, and the fun really begins when you decorate them. You can use various colors of royal icing to create beautiful egg designs. Once decorated, simply break open the cookie to reveal a stash of small candy treats inside. This fun twist makes them perfect for any Easter celebration!
Ingredients
- 2 3/4 cups all-purpose flour
- 1 teaspoon baking powder
- 1/2 teaspoon salt
- 1 cup unsalted butter, softened
- 1 1/2 cups granulated sugar
- 1 large egg
- 1 teaspoon vanilla extract
- Royal icing (various colors)
- Small candies for filling (e.g., mini eggs, jelly beans)
Instructions
- Preheat the oven to 350°F (175°C). In a bowl, mix flour, baking powder, and salt. Set aside.
- In a large bowl, cream together the softened butter and sugar until light and fluffy. Beat in the egg and vanilla extract.
- Gradually add the flour mixture to the butter mixture, mixing until a dough forms.
- Roll out the dough on a floured surface to about 1/4 inch thick. Cut out egg shapes and place them on a baking sheet lined with parchment paper.
- Bake for 8-10 minutes or until the edges are lightly golden. Let them cool completely.
- Once cooled, use a small knife to cut a hole in the top of each cookie, creating a lid. Fill the inside with small candies and replace the lid, then decorate the cookie with royal icing.
Sunshine and Clouds Cookies

Sunshine and Clouds Cookies are a delightful addition to any Easter celebration. These cheerful treats combine soft, buttery cookies with vibrant yellow icing for the sun and fluffy white icing for the clouds. They not only look adorable but also taste fantastic with a hint of sweetness that makes them perfect for both kids and adults.
This recipe is simple enough for beginners and can be a fun project to do with family or friends. The smiles on these cookies will surely brighten anyone’s day, making them a hit at any gathering!
Ingredients
- 2 3/4 cups all-purpose flour
- 1 teaspoon baking powder
- 1/2 teaspoon salt
- 1 cup unsalted butter, softened
- 1 cup granulated sugar
- 1 large egg
- 1 teaspoon vanilla extract
- Yellow and white food coloring
- Black and red edible markers or icing for decoration
Instructions
- Make the Dough: In a bowl, combine flour, baking powder, and salt. In another bowl, beat the butter and sugar until fluffy. Add the egg and vanilla, mixing well. Gradually add the dry ingredients, mixing until a dough forms.
- Chill the Dough: Wrap the dough in plastic wrap and refrigerate for at least 1 hour to make it easier to roll out.
- Shape the Cookies: Preheat your oven to 350°F (175°C). Roll out the chilled dough on a floured surface. Use cookie cutters to create sun and cloud shapes.
- Bake: Place the cookies on a baking sheet lined with parchment paper and bake for 8-10 minutes until lightly golden. Let them cool completely.
- Decorate: Once cooled, use yellow and white icing to decorate the cookies. Add faces with edible markers or icing to give them character!
Cookie decorating has become one of our cherished Easter traditions alongside our annual Easter egg hunts and craft sessions. Whether you’re planning a full day of Easter activities starting with crafts from our DIY collection, leading into an exciting egg hunt, and finishing with cookie decorating, or just looking to try one special activity, remember that it’s all about making memories together. From my family’s kitchen to yours, happy Easter baking!
Printable Recipe Card
Want just the essential recipe details without scrolling through the article? Get our printable recipe card with just the ingredients and instructions.